Showing posts with label for diabetics. Show all posts
Wednesday, February 10, 2016

dinner soups : black carrot soup with walnuts and feta , making the most of the season


black carrot soup with walnuts and feta

I absolutely believe in the theory of demand and supply. Although the market has now started manipulating the demand by creating a fake demand for marketing some cheap and faux foods, the faux foods are made desirable using the medium of advertising, sponsored research and peer reviewing.

In such a situation we as consumers have a bigger responsibility in ensuring the food and ingredients we get are real if not organically grown. We must start asking for foods and ingredients that we want and not fall for what is available, the market responds.

My experience is that when I started asking my neighborhood subziwalas to bring chane ka saag (chickpea shoots) they slowly started bringing and now I see many of them bring it more frequently. Likewise happened for many other greens, heirloom varieties of lime, cucumbers and many more native vegetables. Similar has happened to black carrots too and I am so glad to see them in abundance this year more than ever. That needs to be celebrated and I have been cooking with black carrots a lot this season.

black carrots

And black carrots are cheaper than the last few years this time, almost half the price I must add. Good news.

And when I want to use a lot of one particular vegetable I normally soup it up. Imagine you consume about 300 gm black carrots in one meal. So much antioxidants and flavonoids in one meal and I do take care to supplement it with enough proteins and fats so the meal is balanced, nutrient absorption is taken care of.

black carrot soup with walnuts and feta

ingredients 
(2 large, meal servings or 6 soup servings for a multi course meal)

500-600 gm black carrots cleaned and diced in irregular pieces
150 gm red shallots or baby onions quartered (use less or skip if you don't like their sweetness)
6-8 pods of garlic chopped roughly
few springs of marjoram or any herb you like (celery works or ad coriander greens)
2 tsp mustard or olive oil, I have been using more mustard oil lately
1 tbsp tahini or roasted sesame paste
2-3 tbsp thick cultured yogurt (whisked)
about 10 walnuts halves
some feta cheese, more the merrier
salt to taste
pepper to taste

black carrot soup with walnuts and feta

procedure
 
Heat the oil in a pressure cooker pan or a deep pan and tip in the garlic, onion and diced black carrots. Add salt and pepper and toss and stir till it all looks glazed and slightly browned at the edges.

black carrot soup with walnuts and feta

Add marjoram or whatever herbs you are using, toss a little and add about 100 ml water. Fix the lid and cook till the first whistle blows. Take off the heat and let the cooker cool. I normally do this in the morning when I cook my breakfast and lunch and leave the pressure cooker undisturbed till required for the dinner.

If coking in a stock pot you need a little more water, cook covered till softened.

Now blend the contents when the soup needs to be served. Transfer the contents of the cooker to a blender along with tahini, yogurt and a little water if required. Blend till smooth.

Transfer to the pot and simmer, adjust seasoning and serve topped with broken walnuts and chunks of feta cheese.

black carrot soup with walnuts and feta

This has been a satisfying delicious soup this season. We normally didn't need any breads with it but you can serve some garlic bread with it and make the meal even more interesting.

We keep some broken walnuts and feta chunks on the side for this soup and keep adding as we go. It does add a lot of texture and flavor to this thick and creamy soup.

Do try soon and let me know if you like. The soup can be made with beet root too but I think the flavours may need some fine tuning as black carrots and beets have very different flavour profile. If you use half red carrots and half beets it might be a better idea.

I crave for my soup dinners when I am traveling trust me. Just back from a long trip to Hyderabad where I was attending the National Permaculture Convergence and even presented 2 sessions about 'health, nutrition and it's correlation with soil' and another on 'native and wild foods'. More on that later, enjoy black carrot soup with walnuts and feta till then.


Tuesday, February 2, 2016

recipe of pickled radish and making paratha meals healthier | radish leaves stir fry on the side


Pickled vegetables may be the way you can include more vegetables in your everyday diet with much ease possibly. This is for those who hate eating vegetables normally.

You do consume a bit of salt along with pickled vegetables but you can adjust the salt at the time of serving by adding a few elements to balance.

Normally pickled vegetables shouldn't make the staple vegetable intake but since pickling in certain ways causes fermentation and makes the pickle probiotic by lacto-fermentation, it is worth adding some pickled vegetables as a side dish or even in salads to bring some punch.

What is more interesting to know that this way you get cheap home cultured probiotics and once you use some fresh vegetables and whole grains in the meal you feed some prebiotics to your gut flora too. A healthy gut flora is the key to good health.

Moreover, you can pickle almost all vegetables you get in any season and pickling can be an all year activity on your kitchen counter. Each season has something delicious to pickle. I will definitely keep posting more recipes of probiotic pickles for you all.


Right now the winter months bring these gorgeous red radishes and I love pickling them in so many ways. The mustard pickled radish is one of the favorite way to pickle the mature radishes, the tender ones go into this brined pickle that I love heaping my plate with.

You know this way one can balance the meals. I usually make methi paratha using millet flours (mostly a mix of sorghum, amaranth and barley flour) or I add some whole chickpeas flour to the mix sometimes. The paratha is always made in ghee and is served with some full fat home cultured yogurt.

See how in this platter I have combined the paratha meal with a roasted tomato and coriander leaves chutney, some yogurt, some amla subzi (recipe will be shared soon) and loads of pickled radish.
 

Paratha is anyways healthy if served rightly, but this millet paratha meal has so much vegetables and fiber from whole grains packed into one meal that it makes the meal low glycemic and safe even for those who want to manage diabetes or weight related goals.

Don't worry about the apparent lack of proteins in this meal as sorghum, amaranth and chickpeas are quite a good source of proteins for normal people. Yogurt of course fills in.

Recipe of red radish brined pickle 

ingredients 

3 large radishes (preferably red) almost 600 gm
500-700 ml water (quantity of water used depends upon how you chop the radishes and how packed they are in the jar)
1 tsp sea salt
1 tsp sugar
1 tsp whole peppercorns

procedure

Clean, wash and chop the radishes in batons. The batons can be according to the size of the jar you want to stack them into. Or slice them if you like. Stack the batons into clean sterilized glass jars.

Heat the water with the rest of the ingredients till it boils for a couple of minutes. Cool down to room temperature and pour over the radish batons stacked in jars. You may need more water if the batons are packed loosely.

Cover the lid and let the radishes pickle on your kitchen platform for at least 24 hours before serving. The taste and texture stays crisp for about 2 days but it depends on the temperature so refrigerate as soon as the radish batons start getting too soggy. It will still be edible when it gets soggy though.

Serve this radish pickle on the side of an Indian meal or with burgers if you like or inside sandwiches or any which way you like. You might end up munching on them as is.

A great way to consume this radish pickle is to add it to some salad. The pickling liquid will serve as a nice dressing too is mixed with some olive oil etc.

The leaves of the radish make wonderful stir fry that we love as stuffing to our parathas or chapati rolls. The recipe of the radish leaves stir fry is simple.


Recipe of radish leaves stir fry 

Just heat some mustard oil (or use any other oil you wish) and tip in some ajwain seeds (Omum seeds), broken dry red chillies and chopped garlic to it. Let them sizzle and then add the chopped leaves of radish. Add salt, mix, cover and cook till the volume is reduced. Then stir and cook for a couple of minutes till the stir fry gets a little dry. 

Add everything to taste, the mustard oil brings much flavour to this stir fry we call mooli ki bhurji. The best taste of this bhurji comes when you use red radish leaves but any radish leaves are good. Add some bits of radish too if you want more of this bhurji to savour.


All such leafy greens are great prebiotic foods and if consumed with whole grains and some proteins they make balanced meals.

You see when such parathas are made using alternative flours they can be a meal in itself. And when these paratha meals are served along with some of these probiotic pickles, some full fat yogurt and may be some more vegetables or chutneys or dips on the side they make a satiating and filling meal that keeps you full till the next meal and you don't end up snacking on nonsense things in between.


Oh and the leftover parathas once quartered and reheated on the griddle make nice tea time snack if you wish. eating healthy is not much of an effort if you plan ahead and keep the ingredients clean and simple.

So make your paratha meals healthier with these probiotic salads of the season. Add more vegetable in every meal and see how your body thanks you in return. Say yes to a big paratha meal any day.

Monday, January 11, 2016

recipe of beans and mixed greens salad and how to keep leafy greens fresh for longer and ready to use


Convenience is the most critical factor that comes in the way of cooking healthy everyday. We fall back on short cut methods, quick sandwiches, take-aways and home delivered food sometimes when we are occupied with work or just can't handle the housekeeping and kitchen both along with work. If you have young kids the convenience factor counts even more.

Being prepared, shopping for fresh greens weekly and keeping some boiled beans, potatoes, may be some chicken helps a lot when you want to cook or whip up quick meals. Paneer and eggs also help me a lot when I have to cook quick meals. We eat simple meals at home but it has to be tasty and different every time. I just cannot imagine eating the same things everyday, apart from some classics that we cook every season without fail.

I make sure we eat loads of leafy greens everyday but I am not too particular about eating them raw always. I would steam and sautee the greens sometimes, would puree and make dips or cook them into a delicious lentil soup.

How to keep leafy greens ready to use...

Someone on Instagram asked me how to keep the salad greens and other leafy greens fresh for a week in the fridge. I know it is a bit of effort if you want to eat fresh greens regularly. First of all you need to buy them regularly to keep them stocked always. I get to shop for my leafy greens once a week but one can buy 2-3 times a week if possible.

Now a days one can order salad greens online and schedule an alternate delivery to get them fresh always. But what to do when you get to buy them once a week. You have to make sure you process them and store them in such a way that you can use them in salads, stir fries and soups.


Now let's see how we can sort the greens, clean them (or not) and keep them ready to use for quick meals whether those are salads, stir fries or soups.

  1. Sort the greens by type so you can use them accordingly over the week. The lettuces, rocket leaves etc keep well for 4-5 days in the fridge, the spinach, amaranth leaves, Bathua, fenugreek leaves etc keep well for 10 days, the beet, carrot and knol khol leaves stay good for 4-5 days while the most long lasting leafy greens are the cabbages of all sorts. Think about the green or ed cabbages, Chinese cabbage, pok choi and radicchio etc, the ones that form a head. These stay fresh for a month or so if stored well. 
  2. For all salad greens, rinse them well, drain for an hour and pack into cloth or paper bags to refrigerate. For the first 2 days they stay fresh and crunchy so use them directly. If they get softer after a couple of days just tear them first and then dip in chilled water while you prepare the dressing and other ingredients of the salad. And if the salad greens have wilted beyond repair in the fridge blend them into smoothies or just blend and add them to lentil soups in the last minute of simmering.
  3. Spinach stays well for a week if it is kept wrapped in a paper or napkin. Choose freshest spinach possible and do not wash it before refrigerating if you are storing it raw. Spinach  should be chopped and cooked immediately after washing else it starts rotting. Baby spinach stays well even after washing and draining the leaves well. You can chop and steam spinach and freeze it in ziplock bags to be added to stir fries and to be blended into soups or to make palak paneer etc.
  4. Fenugreek (methi) leaves are a little dry and can be washed and chopped before storage. Keep the chopped, ready to use fenugreek greens in a ziplock bag (pierced to allow aeration) or a cloth bag. These will be great even if they dry up a little bit. 
  5. Amaranth greens (both red and green variety) keep well if washed and chopped, stored in a perforated ziplock or cloth bag. If kept unwashed these greens last longer as these are almost drought resistant greens.
  6. Bathua leaves I always wash, chop and steam before storage. Bathua (Chenopodium) doesn't keep well because of higher water content in them. So steam bathua and store, chop or blend when required.
  7. Purslane (kulfa) has high water content but it is a succulent type plant so it keeps well in the fridge for 2 weeks. It stays good even at room temperature for 3-4 days. 
  8. Fennel bulbs, leeks and spring onions keep well if the leaves are trimmed. Keep the leaves separate and use them first, the bulbs stay for longer. Keep them refrigerated in cloth bags or paper bags. Knol khol leaves are better cooked with the bulb like this Monji haak recipe, but keeping the greens separately helps in this case too. 
  9. Cabbages last quite a long time. The tighter the head of cabbage the longer it will last in the fridge. My home grown cabbages last about 6 months in the fridge, the ones from the market are already a couple of months old when they reach you. Do not wash the cabbages before storage. The good thing is that the cabbages do not require cleaning and can be chopped quickly before cooking or tossing into a coleslaw or chopped salad. 
  10. If you are getting mixed salad greens remember to rinse them first and store in a cloth bag or perforated ziplock, but not for more than a couple of days as some of the varieties of salad greens may spoil earlier and cause other to rot too. Dip them all in chilled water before tossing into a salad. I never use a salad spinner to dry the salad greens but I do let them drain in a colander for some time.
Last but not the least, grow some of the herbs and salad greens in whatever space you have. Try and find more leafy greens that grow wild around you and use them. In this salad you can see some Oxalic leaves that impart a tart bite to the salad. 

Coming back to this beans and mixed greens salad, I have used a native variety of cow peas in this salad which is a brown and smaller variety of black eyed peas. The taste is much better than the regular black eyed peas and it cooks faster too. In local parlance it is called as laal chowli or desi chowli or desi lobiya.


I keep using different types of beans for my salads or hummus or even stews. This laal chowli I find suitable for a stew as well. In fact I stir fried the boiled laal chowli with spinach and bathua (separately) and it tasted so good that I thought of making hummus with it too. The beans were boiled and stocked for making quicker salads for my lunch though.

ingredients 
(serves 2 for a full meal)

1 cup boiled laal chowli (lobiya) or black eyed peas (or use any beans you like)
3/4 cup black grapes halved (or use orange segments)
3-4 large cherry belle radishes thinly sliced or beets thinly sliced
300 gm mixed salad greens torn into bite sized pieces
I used a few oxalis leaves (khatti buti) for a tart bite
2-3 tbsp chopped walnuts

Few pieces of thinly sliced toasted bread (preferably multi grain or whole wheat)

Dressing 
1 tbsp lime juice
2 tsp or more extra virgin olive oil (or use mustard oil)
2 tsp tahini paste (or use sesame powdered fresh)
salt and pepper to taste
1/2 tsp minced garlic (2-3 cloves)
2-3 black grapes crushed

preparation 

Make the dressing by whisking everything together.

Add the boiled beans (room temperature) to the dressing and toss with the mixed greens, radish slices and chopped grapes or orange segments.

Sprinkle with chopped walnuts if using.


Fill into a salad bowl and arrange the toasted bread slices to one side. Drizzle with a little olive oil and serve immediately.

This salad is a fine balance of flavours and textures. The black grapes give it a sweetish flavour that enriches the dressing so much I felt like making the salad again and again. I used orange segments the next time when I used red cabbage for the salad and it was as good.

Do not skip radish in this salad as it gives a nice crunch, you can add thickly grated or julienne of radish if you want.


Wednesday, January 6, 2016

Eggs for breakfast : 12 ways to have eggs for breakfast and include vegetables too | spinach spring onion and feta cheese frittata recipe


Eggs are convenient, quick and cheap source of protein, we must take advantage of this. I do always. It helps that we can pack in loads of vegetables along with our eggs even for the breakfast.

I know many people who balk at the thought of having vegetables along with breakfast and even if they try they get bored with the vegetables. No one ever gets bored with the breads and the fruit preserves and the nut butters or bacon, vegetables feel too boring to be had everyday.

I love my vegetables and can have them any time of the day but even I get bored with the same ways to cook them. Variation is the key when you resolve to eat more vegetables or anything that is good for you every single day.

Eggs and vegetables to be combined for breakfast is the easiest way to ensure one gets the advantage of starting healthy early in the day, this kind of breakfast prevents from any binge eating before lunch time or even after that. Trust me.

The key is to shop for vegetables mindfully, get them cleaned and chopped in advance and be ready for a quick filling breakfast in the morning.


Here is the recipe of the day.
Spinach spring onion and feta cheese frittata.

ingredients 
(2 large servings)
 9" diameter pie dish or pan for baking the frittata (you can choose any deep dish that suits the purpose)
150 gm finely chopped spinach
200 gm finely chopped spring onion, with the bulbs
some sun dried tomatoes to taste
1 tsp minced garlic (optional)
chilli flakes to taste
salt and pepper to taste
fete cheese about 50 gm crumbled
5 eggs

procedure

Whisk the eggs with the minced garlic if using and salt and pepper. Keep aside.

Grease the deep dish, spread the spinach first, press down and then spread the spring onions and the chopped sun dried tomatoes.

Pour the whisked eggs over it and then top it with crumbled feta cheese. You can use any other cheese you like. Toss in some bits of bacon or ham or even boiled and shredded chicken if you like. At this time you would notice the eggs are not visible in the dish.

Bake at 180C in preheated oven, covered with aluminium foil to prevent burning the surface. The frittata should be done in about 20 minutes, check by poking a fork if the eggs are set. You can grate some cheese over it and broil again till it melts.

The eggs will cook and fluff up, you will be able to see the cooked eggs with a rich green mosaic of the vegetables.


 And feta cheese makes plain boiled eggs quite interesting too.

I use feta over some grilled eggplant sliced to make sandwich and supplement the breakfast with boiled eggs. 


Very this sliced of bread, fat slices of eggplants, loads of greens, some feta and boiled eggs. Not much cooking involved to make a filling delicious breakfast.

And then we have boiled eggs topped with loads of this Indian style coleslaw or kachumber.


Plain boiled eggs are halved and then topped with some grated carrot, chopped coriander greens, chopped green chillies or capsicum and some chopped onions. This is drizzled with some extra virgin olive oil and salt and pepper to taste. A simpler version of this Indian style egg salad is a common street food during north Indian winters, especially in the mountains.

Boiled egg salad with lettuce 

Another egg salad is the one that I make when we have some lettuce growing int he garden.
Some torn lettuce of choice, some thinly sliced onions, and some chopped boiled eggs. Everything is tossed with a light cream based dressing. Mix minced garlic, salt and pepper along with some mustard and whisk, add to the salad and mix lightly.


Serve immediately. This is one versatile egg salad and we keep changing the greens as per season. Some tomatoes and baby spinach also make this salad very nice.

And who doesn't like a nicely scrambled eggs?

This version is a bacon, chives and Parmesan scrambled eggs and is loaded with chopped onions and fat green chillies (mild hot).


1/2 cup minced onions sauteed with butter till brownish, some sliced fat green chillies of cubed capsicum thrown in along with chopped bacon and then some parsley and whisked eggs. Scramble, season and then grate some Parmesan over it and enjoy as it is.

Scrambled eggs with chives

The all season favourite is the chives scrambled egg.  Half a cup of chopped chives for 2-3 eggs and salt and pepper to season. I cook this scramble mostly with a tbsp of light cream or even some milk and not butter.


It turns out great every time. With a multi grain bread and ginger chai this makes a happy breakfast for us.

And talking about the egg scrambles, one of the most popular in my home is the drumstick leaves egg scramble.


We normally make it for a weekend brunch and have it with our multigrain roti. This kind of a brunch takes care of our weekends when we work in the garden or do spring cleaning of the house.

And Spanish omelets need not be too neat and nicely layered.

My Spanish omelets are mostly a mosaic of colours like this.


I saute quartered tomatoes, coloured bell peppers and some chucks of onion with some salt and pepper and then pour whisked eggs. Cover the pan and flip the omelet after a couple of minutes. This Spanish omelet is ready in about 3 minutes and serves one.

Fried eggs demand some bacon or sausages and of course some grilled vegetables. 


I grill the sausages and vegetables in a pan first, empty them all on the plate and then break the eggs in the same pan without adding any more butter to cook them. Wait till the yolk gets ready to your choice and flip them on to the plate. Eat/serve immediately.

Some mushrooms and a mix of peas, carrots and potatoes is a great change to the eggs and vegetable routine too.


This carrot and peas is mostly made pepper hot, the way I like it.

Masala omelet with stir fry vegetables 

The most common thing I do when I make a masala omelet is to throw somee chopped vegetables in the same pan and cover it for a couple of minutes, no extra fat required for this half done stir fry. My vegetables on the side of an omelet is ready to devour.


This way you get some onion, coriander leaves etc in the omelet and some more vegetables on the side.

Stir fry vegetables with soft boiled eggs

I stir fry some vegetables in a pan and boil the eggs on the other stove, quickly soft boiled eggs with warm stir fry with herbs and pepper is very comforting.


I am sure you got an idea how you can eat eggs regularly along with vegetables of your choice and still make it interesting and delicious every single day.

I will keep sharing more ideas because we eat eggs a lot. I keep sharing my meals and breakfasts on my Instagram page too, follow me there if you want more ideas.


Sunday, January 3, 2016

lentil and greens soup to balance the diet regime | lentil soup with broccoli, garlic leaves and carrot leaves

Lentil soups are one of those meals that I cook whenever in doubt. There are times when I want to eat all the vegetables and lentils in a warming comforting meal and don't want to cook an elaborate meal. Especially for dinner I want a warm cup to hold in my hands and sip the goodness slowly.


And recently I found a glass breakfast cup (measuring 700 ml) that I use for my soup meals as well. What is even better is that the huge cup fits in my large palm quite snug with my thumb slipping into the handle. You will find more soup mugs in my home than plates probably, I love my soups so much.

The good thing is that one can add just about any vegetables and greens to lentils and make the most delicious soup, that allows using the seasonal produce in a great way. Knowing what combinations of vegetables you like and adding on the seasonings right works wonders in this case.

I am a great fan of pressure cookers for making life easier when I want healthy and filling meals in a jiffy. And I get a secret pleasure when others try guessing what all has gone into the soup and I reveal the presence of carrot greens in it. Yes this lentil soup has carrot leaves along with broccoli and some fennel leaves.


Now most people hate broccoli and everyone that I know has shrunk their noses to carrot leaves. Luckily they just hate it and say no to these wonderful vegetables when suggested, but when I make the carrot leaves paratha no one seems to mind what leaves are those.


I know carrot leaves have very little taste and a slight bitter aftertaste that even I don't like. But carrot leaves lend themselves well in parathas and soups in combination with some aromatic ingredient.

Note that there are many articles on the internet telling you how 'toxic' carrot leaves are, how the alkaloids are so harmful that it may be deadly but in my experience I never saw any toxic effect of the greens. No one would be able to eat so much carrot leaves to cause death by overdose of alkaloids. If you can have instant coffee you can have carrot leaves too.

I find *mixed lentil (see ingredient list) works better for thick and creamy lentil soups. Although you can use any lentils for making soups, this mix of split black beans with skin, split mung with skin, split red lentils, split pigeon peas and split chickpeas is the current favourite of mine.


Even for this lentil soup the carrot leaves taste great along with some green garlic, a few fennel leaves and a lot of broccoli. I added coconut milk for making the soup smooth and garlic butter because I wanted some warmth.

ingredients 
(2-3 large meal servings or 6-7 soup servings)

100 gm *mixed lentils (split urad daal and split mung with skin, masoor daal, arhar daal and chana daal)
2 small broccoli (250 gm) along with the stems, hard portions removed
5 green garlic shoots (50 gm) chopped (optional)
leaves of 6 carrots (70 gm)
3-4 stalks of fennel (or use coriander leaves or dill leaves)
salt to taste
1/2 tsp turmeric powder
6-7 pods of garlic peeled and minced
2 tsp butter or ghee
100 ml coconut milk
pepper powder and red chilli flakes as per taste
lime juice 1 tsp

procedure 

Rinse lentils and soak for an hour or so. Or use directly in a hurry.

Place the lentils and all chopped vegetables in a pressure cooker along with 2 cups water, salt and turmeric powder and pressure cook for 10 minutes after the first whistle. Let it cool till you can blend the cooked contents.

I generally pressure cook the above mix in the morning and do not open the lid till the dinner time when I have to cook the soup. Once pressure cooked the contents stay unspoiled till you open the cooker. This way I get cold cooked lentils and vegetables that can be blended conveniently.

Blend the lentils and vegetables mix and return to the cooker pan. Add the coconut milk, adjust seasoning and add the garlic butter too. Simmer till the soup is hot and creamy.

Serve with a little more coconut cream or milk as garnish.


The soup is so delicious I often overeat whenever I make this. I started making this soup when there was a glut of carrots in my garden few years ago but the carrots remained very thin and gnarled as the soil had too many stones. I went ahead and used the leaves and now I always get a bunch of fresh carrots with leaves whenever I spot them in the market. The garden makes me learn so much.

The soup tastes great when thick and creamy when you are having it as a meal. If you are planning to serve this soup as part of an elaborate meal you must keep it thinner as you wouldn't want a too filling soup to start a meal. Garnish the thinner version of this soup with a slice of lime and see how everyone loves the hint of fennel or whatever herb you decide to add to this soup.

To tell you the truth I make this soup quite often when the broccoli are past their prime. The herbs, the coconut milk and garlic butter lift this soup to another level. The carrot leaves will not even be noticeable in the overall scheme of things trust me.

You can add beet leaves and cauliflowers or simply loads of coriander leaves and tomatoes to make the same lentil soup along with coconut milk or dairy cream or even buttermilk. Try one of these combinations to know what I mean.

The combination of lentils and such vegetables in a soup makes it easier to balance out any eating out or eating for social obligations. Eating simpler meals at home is the best way to be able to enjoy eating out occasionally.

But it doesn't mean you can go berserk when eating out, too much damage to the eating discipline will need more strict measures to undo the damage.


Monday, December 14, 2015

how to cook goat (mutton) liver | recipe of goat liver fry and fried rice with mutton liver


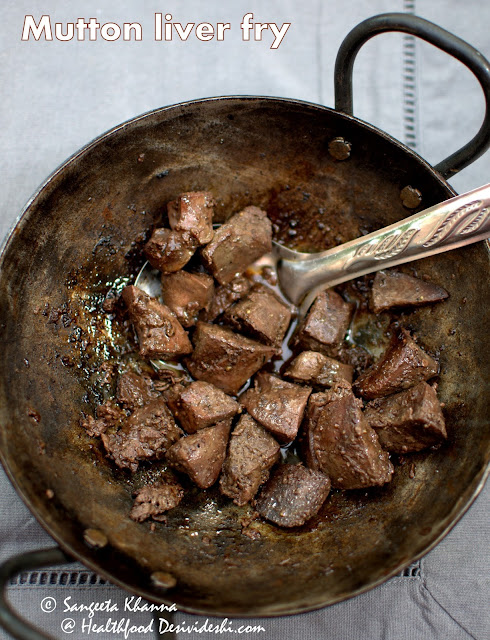
salt n pepper mutton liver fry

Goat or mutton liver is not one of my favourite foods. I started eating it when I realised this is the easiest way to get a booster dose of Vit B12 which we tend to be loosing too fast in our stressful life. Stress and Vit B12 (cobalamine) deficiency feed each other and we just can't afford to be deficient in this Vitamin which is not found in any vegetarian source.

The only vegetarian source of Vit B12 is fermented foods, but I am not sure how many people consider fermented foods as vegetarian or if it is considered vegan, going by the way these trends are gaining statures like one of the manic religions. And for some reason many people think I am a vegetarian knowing I write a healthfood blog. I mean they consider vegetarian eating healthy and anyone who is writing about health must be vegetarian. This kind of logic is beyond my understanding, especially when vegetarians eat loads of processed foods and consider it healthy.

But anyway, even mutton liver was beyond my imagination and I could never eat it initially when I started eating meats. I hated the texture and even the smell. Then I started experimenting with the recipes and found a few ways even I like my mutton liver. One of those recipes is a curry patta spiced mutton liver and another mutton liver with coriander greens.

Sometimes the most basic recipes end up being quite nice and this ghee fried mutton liver with just salt and loads of pepper is one of the ways I like it. Just remember to use freshly crushed pepper corns and cook the liver just for about 10-12 minutes or till it is succulent when you cut one of the pieces.

It is very important to know how to cook mutton liver, as wrongly cooked mutton liver may make you hate it for ever. Over cooked mutton liver is chewy and rubbery and under-cooked liver oozes blood. The piece of liver should stop bleeding when cooked, and it is done as soon as it stops oozing. If cooked more it starts getting chewy and you may not like it.

Ingredients

250 gm mutton liver
salt and pepper to taste (freshly crushed pepper, more the better)
1 tbsp ghee

procedure 

Heat the ghee and dump the liver pieces into it. Fry for about 2 minutes and then sprinkle the salt and freshly crushed pepper. Stir fry till the liver pieces start changing colour and stop oozing blood when cut through.

Once done this kind f mutton liver is loved by most people, especially with drinks.

Making the mutton liver fried rice

I sometimes make it in large amount and reserve some of the pieces in the pan to make a fried rice with it, using leftover refrigerated rice.

Just chop the mutton liver pieces into really small bits using a sharp knife or spatula within the pan, sprinkle loads of chopped spring onions and a dash of soy sauce, stir fry for a couple of minutes.

Now add some cooked plain rice, adjust seasoning and mix well while stirring it to cook well too.

mutton liver and spring onion fried rice

Serve hot with some radish slices or any green salad.

In fact this fried rice has also become my way or eating mutton liver. I cut the pieces so small that I don't even realise the texture (that I am not too fond of) but the flavour is great along with spring onions and a dash of soy sauce.

Do let me know if you try this. Adding leftover refrigerated rice is a good way to make such fried rice for two reasons. One, the rice mixes up really well with the vegetables and whatever meat or eggs you are adding. Secondly, the rice starch become resistant and hence the glycemic index drops. So this mutton liver fried rice recipe is a very low glycemic meal. Safe even for diabetics.


Monday, December 7, 2015

101 alternative flours | gluten free cake | ragi cake with carrot and orange

Recently I baked a cake for the birthday of a very sweet gentleman I had just met. It was really funny the way I got to know that it was his birthday that day, but once the birthday was revealed we had to do something. And what better to do than baking a cake?

ragi cake with carrot and orange

It was last weekend when we were at Tijara Organic Farm, among fresh produce and lovely birds. We spent the weekend eating local cuisine cooked with the farm fresh organic ingredients while shooting pictures of the beautiful property lovingly constructed by Sneh Yadav and Tara Rao.

And it was Tara's birthday that day. I decided to bake a cake that resonated with the principles Tijara Organic Farm lives by.

We went through what was there in the pantry and decided to do a ragi cake with orange and carrots, everything fresh from the farm, ragi flour had come from the organic farmers in Rajasthan. Then I realised I had to work without an oven to bake the cake.

I used to bake a cake in pressure cooker long back, but the pressure cooker available there was too small. We did a lot of improvisations and decided to bake the cake in a ceramic pot with lid. For such baking one has to fill up the base pot with sand and then heat it up on gas stove, then the cake tin is kept over the sand and covered. In case of pressure cooker the lid is fixed without the pressure vent.

Here is how we placed the cake (in a borosil dish) inside the ceramic dish for baking.

baking cake in a pan

Also, while mixing the cake batter that day I kept adding the ingredients by approximate spoonfuls and Sneh asked me whether I do this way always. I actually used to bake so much cakes earlier that the eyeballing method never failed me. I started weighing the ingredients only after I started writing the recipes for you all to follow. My instagram and facebook shares of the birthday cake brought in some requests for the recipe of this gluten free ragi cake.

So after coming back home, I made the cake again, weighing everything so the recipe can be shared. This time I topped the cake with loads of chopped walnuts, the way we like it.

ragi cake with carrot and orange

ingredients
(makes 16 squares)

220 gm ragi flour (finger millet flour)
110 gm ghee (melted, at room temperature, or use soft white butter)
100 gm unrefined sugar
220 gm grated carrots
3 large eggs
1.5 tsp baking powder
zest of 2 oranges (I used local kinnows)
juice of one orange
pinch of salt
80-100 gm walnuts or a handful

procedure 

Mix the dry ingredients in a large bowl. The ragi flour, the baking powder and the salt and sieve together or just whisk to mix well.

Grind the unrefined sugar with orange zest in coffee grinder or mixie jar. Now mix the wet ingredients. Add the eggs, ghee and sugar orange zest mix together and whisk till creamy and smooth.

Pour the wet mix to the dry ingredients bowl. Mix lightly while adding the grated carrots. The mixture will be quite thick and resist mixing. Add orange juice to ease out the batter but do not make it flowing consistency. It should be barely flowing.

Now grease a 7"X7" baking pan and pour the batter into it. Sprinkle the chopped walnuts and press using your fingers lightly to make them embed nicely.

Bake at preheated oven at 180C for 40 minutes or till the center becomes firm, check with a skewer if in doubt.

Cool and cut the cake in squares.

This ragi orange and carrot cake fills your home with a pleasant aroma while it is baking. It is difficult to resist but the wait to cool down the cake will be well worth.

ragi cake with carrot and orange

This cake has a delicate crumb just like the ragi ginger honey cake I have shared few years ago. If you cut the cake when still warm it crumbs a lot but when you cut in after cooling down it behaves well.

Ragi orange carrot cake makes nice breakfast cake with milk and may be a banana or eggs. If you are baking it for a birthday you can dress it up with some orange chocolate ganache. Or may be some orange buttercream.

The birthday boy (Tara Rao) for whom I baked the cake that day is diabetic and I had baked the cake with lesser sugar. The ragi, ghee and carrots in the cake ensure the cake remains low glycemic even if it is lightly sweetened with sugar. So diabetics can have a decent sized serving of this cake too. 

I know many diabetics who wouldn't eat any desserts because they are denied and whenever they find a change they binge upon mithais and unhealthy cakes from the market. Baking such cakes for them more sense than making them crave for sugary stuff and giving in to temptations.

ragi cake with carrot and orange

Tara messaged me that he loved the cake and finished the leftovers with his coffee the next day. Sneh said this was the best cake she has had. I know it was a sweet complement from a friend but Arvind loves it too.

I myself liked it when I tasted a small piece but personally I wouldn't be able to have it for breakfast like Arvind. I like my savoury breakfasts better.

This ragi orange carrot cake will be useful for those who want gluten free options and of course for those who want to watch their weight while enjoying a few pieces of cake sometimes. Do let me know if you try this cake recipe. It always feels great to hear feedback from you all.

I will share a pressure cooker cake soon. I know some of you were waiting for that too but I couldn't manage to do that. A pressure cooker cake needs either a short video or a step by step pictures to understand the process better.

Please not this cake doesn't behave like any white flour cakes but the taste is great. The texture is also very different from regular flour cakes but great nonetheless. Take care of reheating the cake slices before serving (in microwave, or any other method that you may apply) as the cake tastes best when warm. The cakes slices better when cold but tastes good when warm. Small inconveniences that can be overcome when you bake gluten free cakes. This ragi orange carrot cake won't disappoint you trust me. 


Thursday, October 15, 2015

sweet potatoes in the season | sweet potato hash browns and apple and sweet potato slaw salad recipes


sweet potatoes

I bought some nice and plump pink skinned sweet potatoes a few weeks ago, first lot of this season as I can't wait for the sweet potatoes from my garden. The leaves are getting lush and spreading like wild fire now, I use the sweet potato leaves to make a stir fry and add them to my besan cheela sometimes, but the tubers have a charm few can resist.

I make many interesting salads using sweet potatoes. This carrots and sweet potato salad has become a favourite since I cooked it on a farm by instinct, and this sweet potato and beets salad is another favourite. Sweet potato and water chestnuts both have the same season so it makes sense to combine them for salads too. You would love this sweet potato pudding we call shakarkand ki rabdi, a dessert made without sugar.

This season I made a shakarakand ka halwa for Diwali special of my Down to Earth column and the rest of the sweet potato was grated to have fun with it. I instantly posted the picture on instagram it looked so pretty. The grated sweet potatoes helped me make a gluten free breakfast on a weekend. It was quick yet delicious sweet potato hash browns made in almost one batch on my dosa griddle.

sweet potato hash browns

Luckily October has finally brought some cheer and we are enjoying our weekend breakfasts in the garden. Some tea was brewed, eggs were fried and jars or peanut butter and Apricot chutney were brought out. The sweet potato hash browns were so delicious we did not need the peanut butter. The Apricot chutney suited really well with the porous hash browns that held together beautifully, thanks to the rice flour I used for binding.

ingredients for sweet potato hash browns 
(2 large breakfast serving along with fried eggs and preserves etc)

scant 2 cups of grated sweet potatoes (washed but not peeled Indian sweet potatoes)
1.5 tbsp rice flour (or use a mix of chickpea flour and oat flour, use buckwheat if fasting)
salt and pepper to taste (keep the salt light if a savoury condiment is being served with it)
ghee or butter or olive oil to shallow fry (1-2 tbsp for a batch of 6-8 hash browns, we had leftovers too)

procedure 

Mix all the ingredients together and let it rest for 5 minutes till the griddle heats up. I used my cast iron dosa griddle and made all the hash browns in 2 batches.

Using your fingers, lift a handful of the grated sweet potato mix and spread over the greased hot griddle and flatten it using a spatula. Drizzle ghee to let it brown on one side. Flip and let it brown on the other side too, some crispness sis desired here so cook till you feel it is good for you.

Make your tea and fried eggs on the other side and serve immediately.

sweet potato hash browns

Next time I am going to serve these with some sour cream or a quark dip. These sweet potato hash browns were so crisp they can be served as canapes.

Adding buckwheat flour makes these hash browns as crisp as the rice flour version but take care not to add too much flour. The hash browns are crisp on the outside with a soft center though you can bake them to more crisp texture. 

I had some more grated sweet potatoes so I mixed it with some lime juice, dash of balsamic and honey and refrigerated it planning to make a salad next day. I love raw sweet potatoes and this salad was intended to be made along with some mung sprouts.

sweet potato and apple slaw salad

But the next day I felt like a fruity salad for lunch and tossed up this slaw salad along with some finely shopped green apple and a popped amaranth and mixed seeds trail mix. Mung sprouts would have tasted great too but after adding one whole apple it became a good quantity for my lunch, hence the sprouts were dropped.

sweet potato and apple slaw salad

I was not planning to share this salad on the blog but I liked it a lot and clicked pictures. You could add any roasted seeds mix to it and get a good crunch in it too.

This apple and sweet potato slaw is a salad that can be made as a meal, as a sandwich filling or even as a topping for canapes.

Thee is nothing special in this salad but do take care to let the sweet potato seep into the lime-balsamic-honey dressing for a few hours before tossing up the salad. Add the chopped apples, the trail mix and some EVOO, toss and serve immediately. I may not add EVOO next time I make it but you can go with what you like.

Hope seasonal produce inspires you too to cook something new every season and you keep reinventing the same old food in new ways. It does bring some cheer every season trust me.

I hope these recipes will be useful for those who are fasting for Navratri too.


Friday, October 2, 2015

kachhe kele ke kabab | raw plantain patties | vegetarian kababs


kachhe kele ke kabab

Vegetarian kababs are much revered for their meaty texture and protein content. Many meaty vegetables can be made into delicious kababs along with some lentils, chickpeas or even cooked beans. Lentils provide a textural base while the fibrous vegetables add the meatiness to these vegetarian kababs and they are great in their own way.

There have been times when I have chosen a vegetarian kabab over the meat kababs as the flavour variation can be very interesting sometimes in the vegetarian kababs. We keep making Kathal ke kabab and kachhe kele ke kababs quite often, but these kababs happen only when the vegetable in question has to be finished and we are in no mood to eat subzi.

lentil kababs

Lentil and nut kababs are made occasionally when we make it a meal with some salad. I even make chickpea kababs quite often to use up any refrigerated boiled chickpeas. Only sooran ke kabab is made on special occasion of Diwali as a tradition and we look forward to it.

This time a young client of mine who is a beginner cook wanted a detailed kachhe kele ke kabab recipe and some raw plantains were going almost black in the fridge. There was no excuse why I should not post a recipe for the girl.

I got them plantains peeled and boiled with chana daal (split chickpeas) to make kababs but again the boiled mix kept waiting in the fridge for 2 days. Finally I made the kababs for a late weekend breakfast. Yes that is not a traditional kabab time but we can decide our own foods at home. Just some chutney and tulsi ginger chai was great with these kababs.

tulsi ginger chai

The resistant starch in the raw plantain (kachha kela) and a good mix of complex carbs and proteins in the chana daal makes these kababs perfect for breakfast if you consider the nutrient profile. That day after this late plantain kabab breakfast we had a grapefruit smoothie for lunch, a couple of teas later in the evening and did not feel like eating any food till dinner time.

ingredients
(makes 8 kababs, we had leftovers too after the heavy breakfast)

4 medium sized raw plantains (kachhe kele)
50 gm chana daal (split chickpeas)
salt to taste
1/2 tsp coarse pepper powder
1/2 tsp fine cumin powder
1 tsp garam masala
2 tbsp finely chopped onions
2 tbsp minced fresh ginger root
1 tsp minced garlic cloves 1 tsp
minced green chillies to taste
2 tbsp finely chopped coriander greens
ghee to shallow fry (2 tbsp for 8 kababs)

kachhe kele ke kabab

procedure 

The hard variety of raw plantains take longer to cook and the slender ones cook faster, so I normally use soaked chana daal for slender plantains and raw unsoaked chana daal for hard plantains. This time I had some mature hard plantains.

Peel the plantains using a potato peeler so most of the fibrous skin is retained. Peel off only a very thin layer, removing any blackened parts well. Slice the plantains in 1 inch thick pieces.

Rinse the chana daal and mix with plantain slices, put these in a pressure cooker, add salt and 1/2 cup water and pressure cook till done. It takes about 10 minutes after the first whistle. Cool, open the pressure cooker, discard any extra water and mash the mixture. Normally all the water is soaked up while cooking.

Add the rest of the ingredients (except ghee) and make a dough. If the mix feel too watery you can add some sattu (roasted chickpea powder) and adjust seasoning.

Now this dough (mix) can be refrigerated for 2-3 days easily, kababs can be fried when required.

Divide the dough into 8 parts, shape into kababs and shallow fry on a hot griddle with drizzles of ghee, till browned on both sides.

If you want a smooth kabab like galouti you can blend the kabab mix in food processor and skip adding onions.

Serve with chutney of your choice. We had it with kachri ki chutney and amla dhaniya patta ki chutney.

Kachri is a tangy tart small melon that lends well to chutneys with loads of garlic and chillies. Amla was chutnified with some dhaniya patta (coriander greens) and chillies.

Here is a picture of kachri, the melons (Cucumis pubescens) that grow all over India wherever there is arid soil.

kaachri

More on this small melon later. It will be good to know that dehydrated kachri powder is used as a meat tenderizer and some mutton kabab recipes use the kachri powder for the purpose.

It was a coincidence that a kachri chutney came up with a raw plantain kabab, kachhe kele ke kabab as we call them.


Healthy Way powered by blogger.com
Design by Free7 Blogger Templates Simple Clean