Showing posts with label vegetarian desserts. Show all posts
Wednesday, September 2, 2015

recipe of date and nut bars with kunafe crust | no added sugar for a scrumptious dessert


dates and nuts bars

Dates are delicious little desserts manufactured and packaged very effectively by mother Nature. That dates are packed with nutrition is no new knowledge. Packed with micro nutrients and minerals, the sweetness of dates is so complex that eating just a couple of dates relishing them slowly gives you much more satisfaction than eating a whole wedge of cake.

Dates are the best example of efficient calories as I say, each calorie carries essential Vitamins and minerals to nourish the body. Read about health benefits of dates here.

I often use dates to sweeten desserts and make a laddu with dates and seeds or nuts, this time I wanted a fancier shape and decided to bake square bars of dates and nuts with a kunafe crust. I used thin vermicelli called sevaiyan instead of kunafe but it works really well as both are the same technically and using local products makes better sense.

I bake another dessert with sevaiyan which is closer to savaiyon ka muzaffar and we love that recipe too. This time we had a family get together for Raksha Bandhan and since my dad is a diabetic I wanted to make something suitable for him. He does eat small servings of such desserts as the glycemic index is lower when table sugar is not used and there are enough nuts in the recipe.

Moreover, serving such desserts to a get together is a great way to know whether everyone likes them or not. I had made 2 more desserts, one was the black sticky rice and mango pudding and the other was a traditional white rice kheer with loads of raisins and shredded coconut. So there was enough variety for everyone.

I am glad everyone just loved these date and nut bars, of course we loved them too and I feel these are tasting better after 3-4 days (stored at room temperature).

dates and nuts bars

The recipe is easy but it takes a bit of time chopping the nuts and dates first (use a cleaver or a food processor) and then the other steps. But the time taken is well worth. You would need about an hour of dedicated time to bake these date and nut bars.

ingredients 
(makes 25 squares)

soft dates seeds removed and chopped 250 gm
mixed nuts (I used almonds, walnuts and cashews) chopped 250 gm
thin vermicelli (sevaiyan) 150 gm
milk powder 80 gm
ghee 15 gm+15 gm
water 60 gm (writing by weight as I weighed everything on the kitchen scale as I kept adding ingredients)
saffron a few strands
8x8 inch baking pan (non stick or lined with silpat, loose bottom works better)

procedure 

I have used raw nuts and I recommend strongly about using raw nuts for this recipe. The taste is just perfect for this kind of recipe which will be baked briefly to get the crust browned a bit.

The nuts must be chopped and 'not powdered coarsely'. Chopping lends a bite to these bars, you can use a food processor with a chopping blade attachment.

Add the 15 gm ghee and saffron to the dates, dump the chopped nuts too in the sticky mass and knead using your hands. The dates are soft enough to make a dough.

Now gather this date and nut dough and roll into a flat square the size of your baking pan. You would need a silpat sheet to roll out this date dough or use a parchment paper as you have to transfer this sheet on the baking tray later.

dates and nuts bars

Now crush the vermicelli. Add the milk powder, 15 gm ghee and water (60 gm or just enough to make the vermicelli moist) and mix with your fingers well.

Spread half of this vermicelli mix on the base of the baking pan, now transfer the rolled out date and nut dough over the base and then cover it with the other half of the vermicelli mix.

Roll out the surface once again to press down the layers using a greased rolling pin.

Now bake at 170C for 20-25 minutes or till the vermicelli layer starts looking golden.

Take it out of the oven and remove the rim of the tray if it is a loose bottom tray or invert the tray over a wooden board quickly. Cut into squares and let the bars cool down.

Store in an airtight container. It stays well for 3-4 weeks at room temperature.

dates and nuts bars

The taste of dates and nuts and the crunchy crust works really well for this dessert that is actually a finger snack too. Most Indian mithais are served like finger snacks and most of them are loaded with sugar. These dates and nuts bars can become one of those Indian yet healthy treats for family and friends, all the better because these can be stored just like our laddus and barfis.

Trust me these bars are filling too, just have one with a glass of full fat milk in the morning and see how full you feel. Overall quite calorie efficient for a dessert.

No I wont do the calorie count for them, but having a rough idea of the calories helps. If the calories consumed pack some nutrition it helps better.

Try these dates and nuts bars with kunafe crust, trust me you will be baking them frequently.


Sunday, August 30, 2015

black, purple and red rice varieties of India | recipe of black sticky rice and coconut cream pudding with mango


We have such a tremendous variety of produce in India thanks to the geographical an climatic diversity through the length and breadth of the country. And I am one of those mad people who collect such produce from wherever we travel.

I often bring even fresh produce in my hand baggage but the suitcases are stuffed with varieties of rice, lentils and millets many a times. A few millet grains tumble out of one of my suitcases whenever I open it for the next travel, thanks to a torn packet once.

But I am also lucky to get many of these produce at the India International Trade fair stalls here in Delhi. I make it a point to go to the state stalls and buy as much as I can carry. And I can carry a lot trust me. In the trade fair grounds you have to carry whatever you buy, a classic shop till you drop situation. The black and purple rice from North East I always get from there.

black, purple and red rice varieties of India

I got many queries about rice varieties and their availability when I posted this picture last week on Facebook. Thankfully we have started getting these varieties in organic shops almost all around the country, sourcing them locally is the best bet though.

The white rice in the picture is a short grain aromatic variety called Kala namak in eastern UP, the same rice is called Gobindbhog in Bengal and probably Ambe Mohar in Maharashtra. The top right is black rice, bottom right is purple rice and bottom left is red rice from Tamilnadu. The kerala red rice looks a bit different.

Here I am sharing about the black and purple rice varieties from north east India. Both varieties are mostly available hand pounded as these are not industrially produced. The black variety is so rich in pigments that the taste is quite complex due to that. The concentration of anthocyanins in black rice is the highest found in food (higher than blueberries) and it is rich in essential amino acids too.

This is how one of my pigment rich meals looks like. Here I have served the purple sticky rice with beetroot tzatziki, boiled eggs and sauteed spinach with garlic and chillies. Both beets and spinach were homegrown in this meal that I shot 2 years ago.

pigment rich meal

Apart from such meals my favourite way of using these black and purple rice varieties is to make desserts with them. The rice gets nice and creamy when overcooked and combined really well with both milk (dairy) and coconut milk or cream. The black rice pudding made with coconut cream is the one I love the most. The rice lends a nutty and creamy flavour to the pudding that combines really well with mangoes.

Sometimes I add just enough coconut cream to make a thick setting pudding and sometimes I add more coconut cream to make it creamier to coat the fruit cubes.

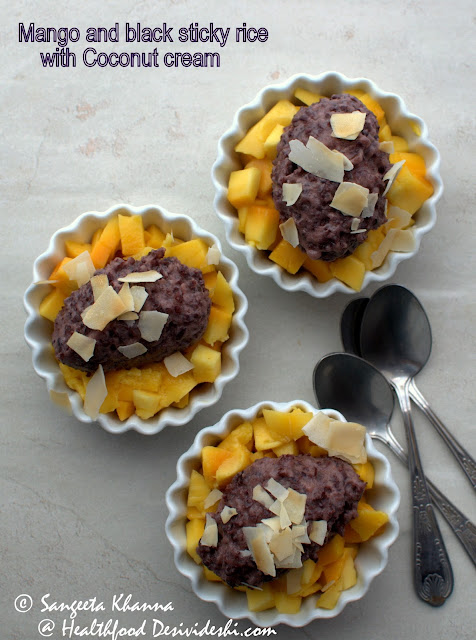
Here is how the well set black rice pudding looks like, over a bed of cubed mangoes and some toasted coconut chips.

black sticky rice with mangoes

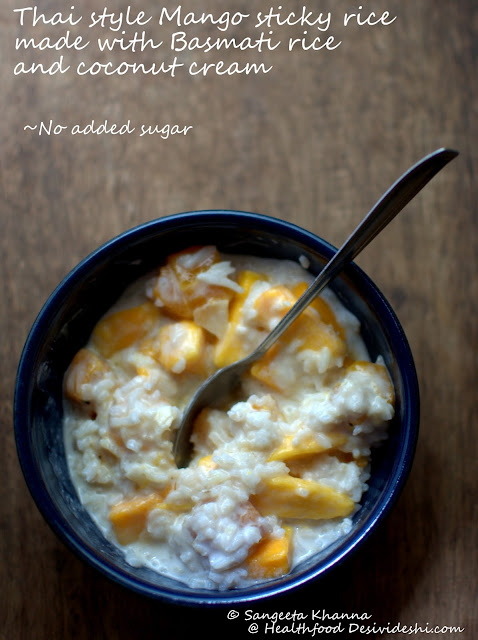
The creamier version looks like this. Moreish and indulgent, very delicious pudding that you can't resist. I make it without any added sugar and it has never disappointed me. The natural sweetness of the rice and coconut cream combines to make a heavenly dessert.

black sticky rice with mangoes

I even make this pudding with the white short grain rice pictured above, the inspiration of this dessert comes from Thai Mango sticky rice and I have been making several versions of it for so many years.

black sticky rice with mangoes

Black or purple sticky rice just makes it so much more value for each calorie consumed. I wouldn't tell you how many times I made this dessert this season. I tried it with all the mango varieties we could lay our hands on and it tasted great with each one of them.

black sticky rice with mangoes

This creamier version I served to my extended family when we all met this weekend and everyone loved it. I had made two more desserts and only one of them (rice kheer) had little sugar in it and my dad who is a diabetic lapped up the 'no added sugar desserts' happily.

The basic recipe remains like this Thai sticky rice with mangoes, the black or purple rice need about 3 times water to raw rice and I prefer it overcooked. If you keep the rice grains just cooked you might feel a slightly bitter aftertaste which disappears once you overcook them.

Once cooked, just stir in coconut cream (25%fat) and adjust thickness as you wish. For 1 cup cooked rice I usually add 200 ml coconut cream to get a set consistency (after refrigeration). For the creamier pudding I add 500 ml coconut cream to 1 cup cooked sticky rice and whisk well till uniformly mixed.

black sticky rice with mangoes

No sugar is required to sweeten it but you can add if you wish, just take care to preserve the natural sweetness of the rice and coconut cream in this dessert, you wont like sugar to hit your palate first in this case.

Try it without any sugar for the first time and see if you want it sweeter. Trust me you wont feel like having any added sugar in this dessert. May be the mango to sticky rice proportion can change if you want it to be more fruity and that is quite good too.

Thai sticky rice and mangoes gets a new lease with black sticky rice trust me.

Sunday, August 16, 2015

Mishti Doi recipe from scratch | a sweetened yogurt with caramelised milk flavour | Calcutta style Mishti Doi


Calcutta style Mishti Doi

I am so glad I started making yogurt once again. Dahi as we call yogurt, is an everyday thing and we were generating a lot of plastic cups apart from relying on a dahi that was not real.

Making dahi at home gave way to collecting the clotted cream from milk and processing it to make ghee too sometimes. But we consume full fat milk and yogurt everyday, the clotted cream (malai) is collected rarely so ghee making is not too frequent, I would like it more often as it gives fresh real buttermilk as a side product that I love.

I will share the ghee making process soon, because home made ghee is the best. Not that I don't buy any from the market.

When I posted the home made yogurt procedure some time ago many of you asked for a Mishti Doi recipe too. Mishti Doi is a popular sweetened (caramelised) yogurt from Bengal that has become popular all over the country.

Calcutta style Mishti Doi

To say the truth, I used to make Mishti Doi very frequently till my yogurt making habit suffered and I resorted to Mother Dairy. I had even posted a Mishto Doi recipe on Banaras ka Khana blog. I must tell you we both love the Mishti Doi from Mother Dairy and that was one reason I stopped making it.

But when many of you wanted a Mishti Doi recipe and  Prasad Np and Sushmita reminded me a few times to share it I had to make it again and click pictures, reason enough to share again. The older Mishti Doi recipe uses condensed milk and is way too sweet for me.

I made it twice with 2 slightly different methods and sharing both of them with my notes on taste and texture.

recipe of Mishti Doi with palm sugar 

ingredients 

1 liter milk (full fat 6-7%)
3 sachets of palm sugar (18 gm)
2 tbsp fresh yogurt for culture, preferably hanged

procedure...

Reduce milk over medium flame till it becomes 500 ml. Cool down till it becomes lukewarm to touch. About 45 C.

Add the palm sugar and the yogurt and whisk well till the milk gets frothy. Use a wire whisk to do this and whisk vigorously. This helps emulsify any fats that may clot at the surface when the yogurt is set.

Now strain and pour in the earthen pot or a ceramic or glass jar. Keep in a warm place for 4-5 hours or till set and smells like yogurt.

Mishti doi recipe

Slow reduction of milk naturally caramelizes the sugars in milk (lactose) making the colour brownish, in this recipe a little color is enhanced by the palm sugar too. I used very little palm sugar as we eat mild sweet desserts so the flavours of the palm sugar are not too prominent. This mishti doi is quite delicately flavoured and mild sweet.

The creaminess is lesser because of less fat content. The sweetness is mild and flavourful due to the palm sugar.


Thanks Sushmita for the Palm sugar you brought from Thailand, we are using it lovingly :-)

recipe of Mishti Doi with caramelized sugar 

ingredients...

1 liter full fat (6-7%) milk
3 tbsp sugar (45 gm)
3 tbsp fresh cream (45 ml)
2 tbsp thick yogurt for culture

procedure...

Reduce the milk by simmering it over medium flame till the volume becomes half. Cool till it becomes lukewarm to touch.

Meanwhile, caramelise the sugar. To do this, add 1 tbsp water to a flat base frying pan, add the sugar and place the pan over high heat. Keep rotating the pan so the sugar dissolves quickly over heat and starts getting brown at the edges. Keep rotating so the sugar doesn't burn at one spot, the sugar melts and gets browned within a minute or so, taking the consistency of honey. Now pour this into the cooling milk. Stir to dissolve.

Once the milk is lukewarm, add the cream and yogurt and whisk well till frothy. Strain and pour into desired pot or individual serving pots. Keep in a warm place till the yogurt is set.

Mishti doi recipe

This one will be more creamy and sweeter. When you use caramelised sugar to get the colour you can't do with light sweetening. This one was not too sweet but just like the Mother Dairy one.

creamy mishti doi

Remember milk has some sugar too, which makes it sweeter when milk is reduced.

Too much sugar would prevent setting of the yogurt and will spoil the taste of yogurt. You wont want sugar to hit your palate first. 

You can add some saffron or cardamom while whisking in the yogurt culture, but I like it plain. We sometimes have it with toppings of nuts or dried fruits or even shredded aam papad.

Srikhand is another yogurt based dessert from Maharashtra which is made by whisking hung yogurt so much that it becomes creamy and smooth. Srikhand can be flavoured with fruits, spices like cardamom and saffron etc too to be served as a dessert, but plain sweetened Srikhand is eaten with poori too I got to know. I have never tried and I don't intent to either.

Mishti Doi always is a proper dessert, sometimes served with a rasgulla dipped into it. The first time I ate a rasgulla dipped in Mithti Doi was at the wedding of Arvind's Bengali friend in Banaras about 2 decades ago. We were not married back then and I remember I was being treated to all sorts of good mithais and mithai combinations because G's father was very fond of Arvind and me.

Making you eat more mithai indicates more love in our country :-) It is well worth gobbling all that mithai if it is good old Rasgulla and Mishti Doi served together. They make a great combination.

Try it sometime and let me know.


Monday, October 20, 2014

how to choose the best ripe avocado and how to use them to get the best nourishment from them | a recipe of avocado strawberry yogurt


Avocados are super food, great for skin and hair and very good for those who want healthy dose of fats nourishing the body every single day. Just about 1/4 of a large avocado will be enough everyday to provide a sizable amount of daily requirement of Vitamins E,C,K and B6 and minerals like Iron, Phosphorus, Manganese, zinc and Magnesium. Avocados have soluble and insoluble fiber that helps the probiotic gut flora, hence the fruit falls into the category of prebiotic foods.

I wish Avocados were available easily all over India but we can plant some saplings anywhere and grow them in our backyard. I have already planted one in a pot because I am fed up of getting rock hard Avocados in the market that refuse to ripen and become blackened at the margins even if they decide to ripen. This happens when the Avocado was plucked too early from the tree and was not ready for ripening.


The right Avocado is the one that has been plucked off the tree when it is ready to ripen but it will be good to know that Avocados do not ripen on the tree. After plucking the fully grown avocado ripens within 2 weeks but if the avocado was plucked early, it may not ripe well and would not develop a good flavour even when ripe. Raw avocados are a horrible taste so don't ever try to use them else you will be put off this wonderful fruit for ever.

How to choose the best ripe Avocado...

1. The avocado you pick up should not be rock hard. It should be give in to pressure just like ripe mangoes. When you press the skin a small dent should be formed. This is the right stage to use Avocados but a little harder than this fruit would need 2-3 days or a week to ripen.

2. The skin colour of Hass Avocados turns a nice purplish red or brown when fully ripe. Hass Avocados are the ones with a crinkled skin so look for the colour and texture shown in this picture.


3. The area adjacent to the stalk sinks a bit when the fruit is ripe and the stalk comes off when pulled. I have tried to show this in the picture above.

4. The skin peels off the avocado easily when it is fully ripe.


5. The green skinned Avocados available in India are the Hall and Choquette varieties. These have smooth and shiny skin but it turns a bit dull and brownish as the Avocado ripens. So look for the right skin colour and how the skin gives in to pressure to ensure the avocado it ripe when you buy.

6. If you decide to pick up slightly raw Avocados and use it after a few days, just wrap them up in a brown paper bag along with a ripe Banana to the Ethylene released by ripe Banana helps the Avocado to ripen. Never Microwave the Avocado to make it soft when it is still raw, as it results in a horrible taste.

How to get optimum nourishment from Avocados, the best ways to use Avocados every day...

1. Let them ripen naturally and use them uncooked. Avocados are best when uncooked as they contain omega 3s (including Oleic acid) and phytosterols (see here) and the fatty acid structure changes a bit when it is heated. Although it doesn't get harmful when cooked. But getting a best nourishment form an expensive fruit makes sense for me.

2. Eat Avocado along with some yogurt or citrus fruits to help absorb all the Calcium, Fatty acids, Iron and other minerals from both categories of food.

3. Peel off the skin thinly and do not discard the dark green flesh just adjacent to the skin as this is the part where most carotenoids of the Avocado are concentrated. It is better o let the Avocado get ripened to the stage when the skin can be peeled off just like a banana peel (picture above) and not to scoop put the flesh from the halves.

4. If the Avocado is used along with lettuce greens, Rocket and carrots etc, the Carotenoid and Lycopene absorption increases many fold even if there is no oil in salad dressing. The fat in Avocado is enough to enable better absorption of these pigments and provide benefit of these antioxidants.

5. If you want to use Avocado for soups you can cook a stock or body of the soup along with seasonings and add chopped or pureed Avocados after the cooking is over. This step preserves the nutrients in the fruit.

6. If someone doesn't like the taste of avocados make mayonnaise or dips using Avocados and add seasoning and herbs as per taste. The pureed avocado takes on whatever flavours you add to it. This may or dip would fit into any kind of meal plan.

7. Use the Avocados as soon as they are ripe. It can stay well for 3-4 days in refrigerator but the nutrients start diminishing once the flesh starts blackening.

8. If you need to store chopped Avocados in refrigerator, take care to douse them with either lemon juice or yogurt or an acidic salad dressing depending on how you are going to use the chopped avocados. If stored exposed the avocados turn black and look unappetizing, nutrient value is affected only marginally.


Would you be eating more Avocados after reading this? They really are a versatile ingredients and not just a healthy fruit you must bring home. Here are a few recipes I love making again and again.

Avocado strawberry yogurt recipe


ingredients
(2-3 servings)

Avocado flesh from half a fruit
Strawberry preserve (preferably home made) 2-3 tbsp
hung yogurt 1 cup ( I used 3% fat)

procedure

Chill all the ingredients before assembling the dessert and serve it right away if so required.

Whip the hung yogurt nicely. I did not add any sugar to the yogurt as the strawberry preserve is sweet enough.

Now add the strawberry preserve and mix lightly, making streaks of red and white. Taste for sweetness and add a little more if required.

Now chop the avocado flesh in small cubes and add to the yogurt and mix lightly. Fill in serving glasses and serve right away.

You can refrigerate the dessert for a day but take care not to keep any bits of avocado exposed to air on the surface of the serving glasses. Push all the avocado in the middle so it gets covered with yogurt, else it will get black.


I invariably end up eating this the next day and always feel the flavours get enhanced the next day. This dessert can actually stay well for 2-3 days in the fridge is the container is sealed well with cling film. The yogurt keeps it fresh and creamy although the colour may get a bit dull after 2 days.

If you have extra Avocados just make smoothies with them. I say make smoothies even if you have to buy Avocados just for the smoothies, the y are totally worth in a smoothie as well.


This Banana avocado almond smoothie is a super satisfying smoothie that keeps you full for more than 4 hours trust me. I have depended on it whenever I am expecting a late lunch and want to skip lunch for some reason.

The avocado strawberry yogurt is a rich dessert too. I recommend it in small servings if you are serving it after a heavy meal, but large servings are okay with a lighter meal.

This avocado strawberry yogurt could be a dessert for a diwali party as well. Would bring you some brownie points for sure.

 
Healthy Way powered by blogger.com
Design by Free7 Blogger Templates Simple Clean