Sunday, September 28, 2014

making breakfast dosa interesting with vegetable based chutneys | making chutneys with ivy gourd and long beans


Including vegetables in everyday meals comes naturally to many of us as we eat loads of raw salads and stir fry vegetables for every meal of the day. Are you on my side eating loads of vegetables?

Oh no? You hate them? Or don't know how to eat vegetables in every meal?

I do come across many of those people too who are clueless on how to include vegetables in every meal of the day and breakfast is the most difficult meal of the day if they want to have vegetables. Who eats vegetables for breakfast many of them exclaim. I understand as even my husband is one of those people. He is totally a fruits and pancakes person when it comes to breakfast but he occasionally likes these dosa (savoury crepes or pancakes) and chutney for breakfast too. In fact when I make a large bowl of chutney and keep it on the table, he takes second helpings if the chutney is not too hot.

Eating a vegetable based chutney can make you consume about 200 gm vegetables with your breakfast. Just remember to make the chutney really tasty and keep the heat quotient lower than usual if you hate to start your day with spicy hot breakfast.

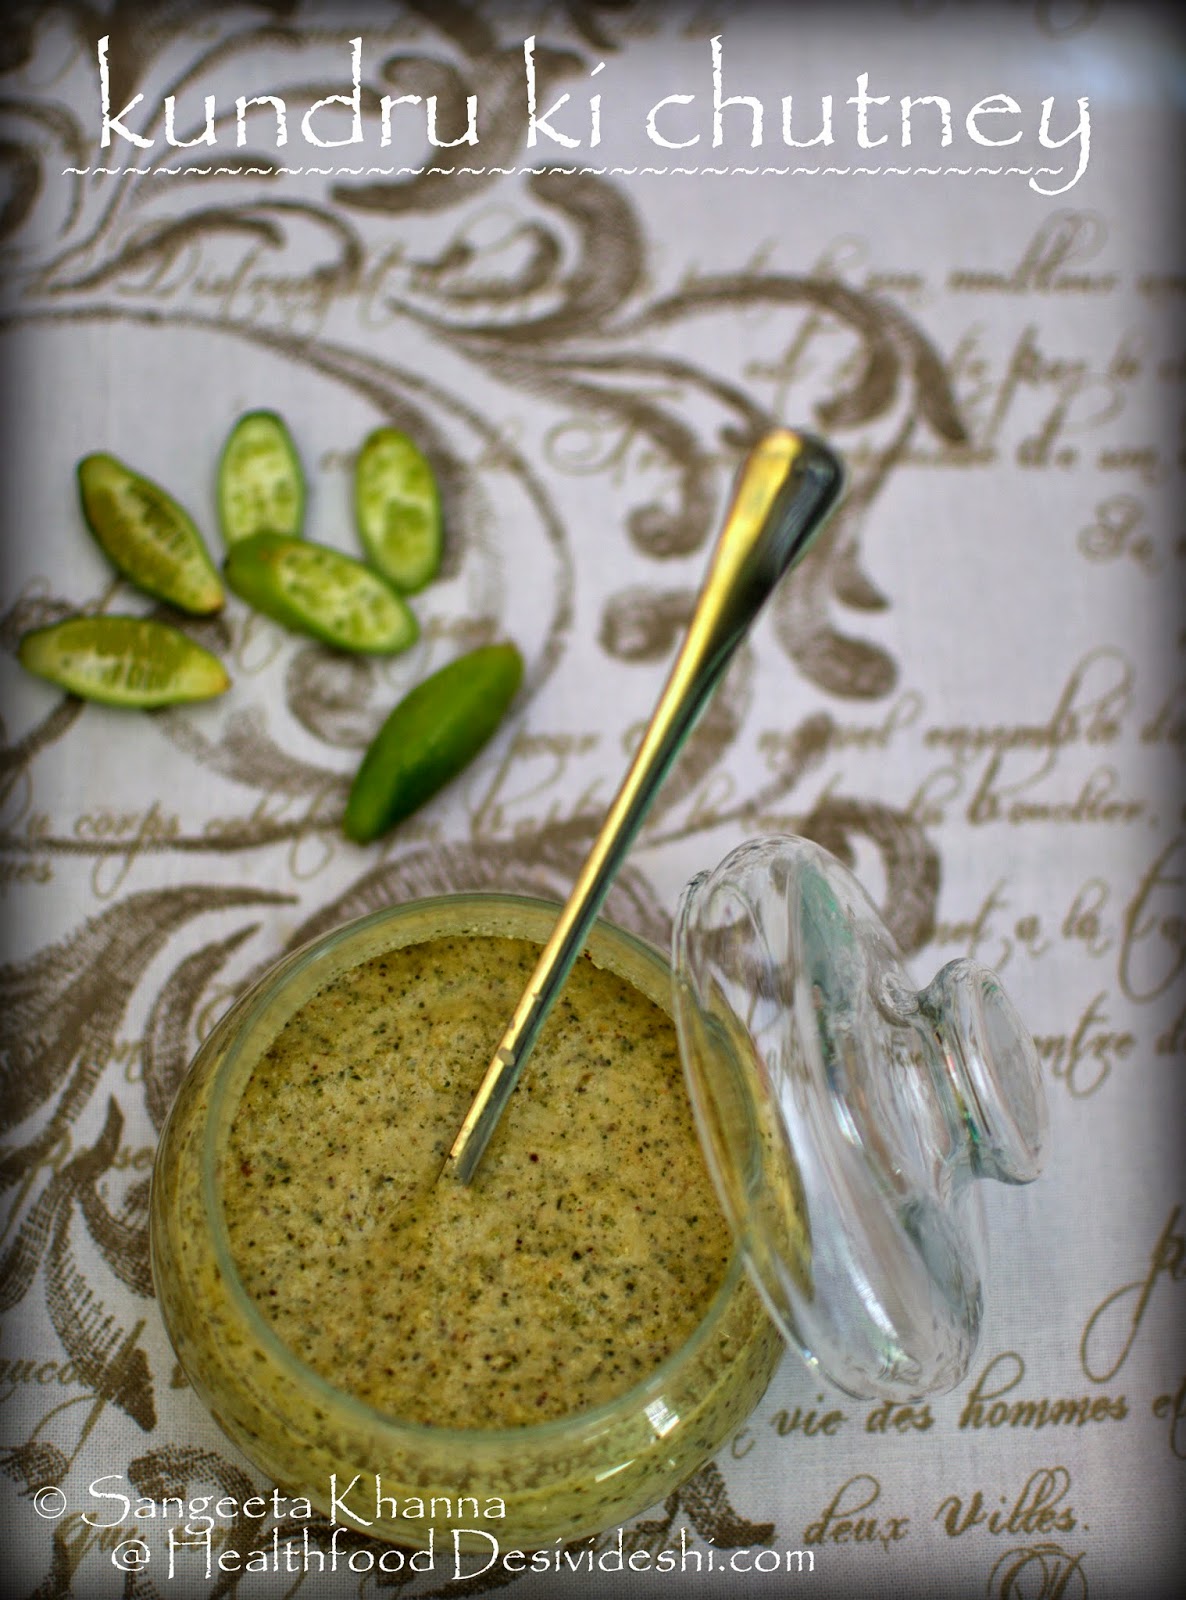
Ivy gourd or kundru is one such interesting vegetable that has natural tangy taste and responds really well to chutney recipes. And what is more interesting, that kundru can be eaten raw as well. Although I like raw slices of kundru in some tossed salad, I usually half cook the vegetable while making chutney as it enhances the taste and helps balance the flavours.

Ivy gourd (kundru) chutney recipe...

ingredients
(2 large servings)
tender ivy gourds sliced 250 gm
red onion one medium sliced (about 70 gm)
curry patta 20 springs
mustard seeds 1 tsp
chana daal (split chickpeas) 1 tbsp
dry red chilies 2-3 or as per taste
fresh grated coconut 1/4 cup
salt to taste
sesame oil or ghee 2 tsp
tamarind 1 tsp

procedure

Heat oil in a pan and tip in the mustard seeds, red chillies, curry leaves and split chickpeas in that order. Let them sizzle and get aromatic and then add the sliced onions. Caremalise the onions on low flame for about 5 minutes.

Add the ivy gourds (kundru) and salt and cook covered for 2 minutes. Take off the stove and let it cool.

Add the tamarind (paste or extract) and blend in food processor or mixie to make a smooth paste. Serve as desired.


This chutney is great with idli, dosa, chilla and savoury crepes. Even with parathas for breakfast along with some yogurt.

I make another chutney with lobiya (long beans) that has become a favourite. It was made as an experiment one day when I found that the maid had chopped a lot of lobiya and I needed to finish it. I decided to add a lot of ginger to it and it tasted hot gingery when fresh. But I was surprised to know that the chutney taste way better the next day, the flavours more balanced and no strong ginger taste. So if yo are planning to eat the chutney fresh, add a little ginger and if you are planning to eat it the next day as as much ginger as you want. I mean add loads of fresh ginger root and see how the chutney becomes a 'hot' favourite.


Recipe of long beans (lobiya) chutney...

ingredients
(2 large servings)
long beans chopped finely 250 gm or 1.5 cup
chopped onion 60-70 gm or 1/2 cup
cumin seeds 1 tsp
minced ginger 1 tbsp or more
dry red chilly 2-3 or to taste
curry patta 15-20 strings
grated fresh coconut 1/4 cup
sesame oil or ghee 2 tsp
salt to taste
tamarind 2 tsp (paste or dehydrated)

procedure

Heat the oil or ghee in a pan and tip in the cumin seeds, chillies and curry patta and let them fry till fragrant. Add the ginger and then the onions. Let these cook till the onions get pinkish brown.

Add the lobiya (long beans) along with salt and stir fry for 2-3 minutes and then cover and cook on low flame.

Take off the stove, add coconut and tamarind and blend the chutney as desired. You might like a coarse consistency in this one. I like it any which way.


I enjoyed this lobiya chutney with a buckwheat dosa one day along with a dry methi (fenugreek) chutney that I had brought from Pune last year. The dry methi chutney is so good I am hoarding it in my freezer.

I have another lasun chutney from the same place and I love adding that too sometimes to my plate. The other day I made a besan ka chilla with loads of onions and mung sprouts and had with these yummy chutneys.


Sometimes my maid eats her breakfast at my place (whenever she is late) and she tasted one of these mung spout chillas along with the chutneys and was curious to know what was this. After all it doesn't look like any conventional breakfast but she enjoys these and eat slowly relishing each bite. She has been seeing my food pictures and now even gives ideas on using utensils for the same. I find it really sweet :-)

These chutneys helps make friends. My maid took some of the lobiya chutney home and said she shared with her neighbor and got complements.

And, she did not tell what this chutney is made of :-)


Thursday, September 25, 2014

poriyal style warm salads : 2 healthy poriyal recipes for everyday meals


Poriyal is a stir fry of finely chopped vegetables tempered with curry leaves, some mustard, red chilly and lentils etc.. topped with a generous amount of freshly grated coconut. The vegetables used for poriyal may vary from cabbage to beans to beets, carrots, okra or even some squashes like Chayote squash or Zucchini. The vegetables are cooked lightly for poriyal, keeping the textures alive but he flavours from the tempering are rich and Earthy and that makes a poriyal the perfect warm salad for me.

Poriyal is a dry stir fry of Tamil origin but it is cooked in Karnataka as well, known as Palya in that part of the country. I used to know this stir fry as Foogath or Foogad as my mom had learnt it from one of her friends and this name had stuck with us. The name could be a matter of origin of the stir fry, may be with a few changes in the tempering or the final taste but the stir fry remained a favourite with me owing to it's simplicity and quick recipe. The vegetables need to be finely and uniformly chopped for poriyals but I love my knife and the chopping board and often chop my vegetables again even after my maid had kept them cleaned and chopped her way. Like I put my cleaver to good use and chopped the cabbage fine after my maid had kept it diced and ziplocked for the day.

I like the poriyals served as salads more than a side dish as a subzi. I often make poriyal into a fancy appetiser serving like these tart shells filled with a broccoli poriyal. Adding mung sprouts to my poriyal is another change that I love doing. Those who swear by authenticity may squirm at this, but I don't shy away from experimenting and trust my own taste buds rather than an authentic recipe.

Recipe of cabbage d mung sprouts poriyal...

ingredients
(serves 2)
finely chopped cabbage 1.5 cup
mung sprouts 1 cup
grated fresh coconut 1/4 cup (loosely packed)
lime juice 2 tsp
salt to taste
pepper powder to taste

tempering ingredients..

sesame oil (or any oil you wish) 2 tsp
hing (asafotida) 1 pinch
curry leaves 10 springs
mustard seeds 1 tsp
urad daal (split) 1 tsp
chopped chillies 1 tsp
minced ginger 2 tsp

procedure..

Heat oil and tip in hing and mustard seeds first and then the other ingredients together. Let them all sizzle for a few seconds and then add the chopped cabbage. Toss and stir fry for about 2 minutes, add salt and pepper. Mix well and add the coconut, sprouts and mix again to coat everything together.

Take off the stove, add lime juice and serve hot, warm or at room temperature.


Another most frequently made poriyal in my kitchen is this green beans and carrot poriyal with mung sprouts. I sometimes get lazy and use dehydrated coconut shreds rather than grating it fresh. The trick is to re hydrate the shredded coconut in hot water before using and add it a minute before you take the poriyal off the stove. Making poriyal with more than one vegetable can be a bit tricky if both vegetables have different cooking time. I microwave the beans for a couple of minutes before adding it to the tempering. That saves time and keeps the texture and colour of the beans nice and fresh.

Note that tempering for the different poriyal variations will be the same. Just the way the vegetables are cooked, the way they are added one after the other would change.


Recipe of beans-carrot-mung sprouts poriyal..

ingredients
(2 servings)

finely chopped beans 1 cup
finely chopped carrots 1/2 cup
mung sprouts 3/4 cup
shredded fresh coconut 1/4 cup
salt and pepper to taste
lime juice to taste

Tempering ingredients will be similar to cabbage poriyal.

procedure...

Steam the green beans till half done. I prefer microwaving it in a covered bowl for 2 minutes.

Prepare the tempering while the beans are steaming. Add the carrots as soon as the tempering sizzles and stir fry for a minute. Add the hot steamed beans and cook for another minute of two, tossing it all the while.

Add the coconut and sprouts, mix well and take off the heat. Mix lime juice and serve as desired.


How do you like these poriyal salads? Try making them with gourds and you would see how tasty the gourds become. Okra tastes great with such a tempering but needs a bit more cooking time. I sometimes add a bit of rasam powder to my poriyal salads to make them more zingy.

Make changes as per your taste but use fresh seasonal vegetables for poriyal salads. These will be full meals when you want a light yet satisfying meal for yourself. Ar just add a couple of table spoons of cooked plain rice or couscous to poriyal salads and see how it turns into an absolutely hearty meal.

Sunday, September 21, 2014

hot and tangy chutneys to cheer up everyday meals | a Burmese tomato chutney and a raw mung sprouts chutney recipe


Everyday meals are so much more fun when there is some fresh fiery chutney in the fridge. I mean the fresh chutneys stay fresh for a couple of days and make life easier, and tastier. Our everyday meals are mostly Indian and chutneys are my favourite way to include loads of vegetables and fiber in my food. And most chutney ingredients are high in antioxidants, Vitamins and minerals too. If I add nuts, seeds and sprouts the chutneys bring a boost to calcium intake as well. So much more worth to chutneys I say. Make your chutneys value added, include them with every meal, take second helpings and eat well. These fiery chutneys will take care of everything else.

This sesame-peanut-coconut chutney is a good supplement of daily Iron and calcium, it is a tried and tested recipe and has helped many people get back to strong bones. All the ingredients of this chutney balance the nutrient profile helping optimal absorption of nutrients as well. We can try and make all chutneys to supplement everyday meals with essential nutrients.

It was last month when my friend Promilaa Bhatia shared a Burmese tomato and peanut chutney on a food group and I wanted to make the chutney then and there. And I did, the chutney was so simple and I had all the ingredients. Also, I was alone at home that day and wanted something to wrap a multi grain roti around. This thick fiery chutney felt right and it did taste great too.

The Burmese tomato chutney was so quick to make that it barely took a 30 minute break from my desk to finish my frugal meal of a multi grain roti smeared liberally with this thick chutney and had like a quesadilla. I made the roti and blended the chutney in this time and ate it too.

Here is the recipe of this Burmese tomato chutney. The recipe makes enough chutney to last 2 meals for one. Just fry some garlic cloves in mustard oil, add to a large bowl of chopped ripe tomatoes, throw in some fiery hot chillies, some chopped coriander greens and some roasted peanuts with skin. Blend to make a coarse paste.


This chutney will make you eat it out of the blender jar. And keep eating it :-)

I had this chutney with a buckwheat crepe the next day. And I whipped up another chutney too as I was feeling chutney inspired and had some mung sprouts in the fridge. This one was blended smooth and made a refreshing accompaniment to my brunch plate.


Here is the recipe of the mung sprouts chutney.

Fry a few springs of curry leaves along with a pinch of hing and a few garlic cloves in a tbsp of sesame oil (or any oil you like). Add some sesame seeds if use any other oil. Add this tempering to loads of mung sprouts, some fresh grated coconut and chillies to taste. Blend till smooth and enjoy.


 I love these chutneys for being so power packed. Better than smoothies as I love savoury breakfasts and fruit based smoothies don't always fit into my scheme of things.

Add loads of curry patta and coconut to this mung sprout chutney and have second and third helpings. I love such chutneys with my buckwheat or amaranth dosa (savoury crepe) or even with a beans and rice meal like rajma chawal or chhole chawal.


Have you tried making chutneys with mung sprouts before? Now is the time if you haven't. Let me know if you try these two fiery yummy chutneys. Keep the chilly heat suitable to your taste and eat loads of these chutneys. You can thank me later.

Thursday, September 18, 2014

crisp baked okra or kurkuri bhindi, the versatile and tangy okra chips


Okra can be a tricky vegetable to handle if you are cooking it for the first time. The slime inside the pods of okra (bhindi) can make it into a gloopy mass of green if cooked wrongly. But the mucilage found in okra is highly recommended if you want to tone up the gut and cleanse it naturally. Along with the mucilage, the fiber content in okra is a good prebiotic.


But what to do to not make okra slimy while cooking?

The first thing that everyone recommends is to pat dry the okra after rinsing well, and rinse it before chopping them. Once the surface is dry, chop them as required and cook uncovered, do not stir too much while making stir fried okra. Once you take these precautions, the okra wont get slimy even if you add water to make a gravy with okra. 

Believe me, this yogurt based gravy with okra is not slimy at all. But if you don't feel confident to cook okra with gravy, cook dry stir fries with it. We love a dry okra with mustrad seasoning, Okra and baby onions stir fry and a very simple ghee fried peppery okra. Apart from these I love steaming or lightly stir frying whole okra with minimal spices like these mustard okra and schezuan pepper okra.

One precaution while buying okra is to choose the tender pods only. The mature pods are too fibrous and even the seeds get too hard to chew.

This recipe of baked okra chips will be suitable for appetisers along with a green chutney or a cheese or mayo dip but you would love it with a simple Indian daal and rice meal or with a simple khichdi.

ingredients
(for 2-4 servings depending on how it is served)
fresh okra pods 250 gm
besan or chickpea flour 2 tbsp
rice flour 1 tbsp
ajwain seeds 1 tsp
turmeric powder 1 tsp
red chilly powder 1 tsp
amchoor powder 1 tsp or a bit more to make it more tangy
salt to taste
mustard or olive oil 1 tbsp

procedure

Remove the stalk and slit the okra pods lengthwise into 4 pieces.


Sprinkle all the dry powders and drizzle the oil over the sliced okra.


And massage everything well into the okra slices. Do not worry if the powders don't stick to the okra as it will eventually season the okra well and some bits of the seasoning stuck to okra will make it nice.

spread this mixture over a baking tray lined with foil or silpat.

 
And bake at 160 C for about 30 minutes. Take out the tray, mix well and bake again at 180C for 10 minutes or till the okra gets crisp.

Serve hot or at room temperature. It tastes great with a nice hung curd dip, mayo dip or a cheesy dip with a sprinkling of mustard.


And you know it makes a very good accompaniment to khichdi meals too. I love khichdis and I love having something crisp and tangy with my multi grain khichdi. Some raita with my khichdi and okra crisps would be even more fun. You could call it kurkuri bhindi if you wish. 

Tuesday, September 16, 2014

a warm Oriental salad with lotus stem | lotus stem stir fry salad with tamarind chilly sauce


Lotus stem warm salad is something I keep stirring up quite often. I find salads made with lotus stem slices quite filling and satiating apart from being utterly delicious. Yes I have tried simple stir fried lotus stem with salt and pepper too and have found it great for my taste. This lotus stem and chicken sausage stir fry salad with soy honey glaze is a hot favourite and a lotus stem stir fry with sweet and sour sauce and another lotus stem stir fry with spring onions is a regular too.

Apart from being an extremely healthy vegetable, lotus stem is incredibly tasty too. One can cook them with s spicy Indian curry, an Oriental stir fry or a Kashmiri style curry with or without knol khol or turnips added. If you have been reading my blogs for some time you would know that I stock lotus stems always in my fridge.


Many people don't buy lotus stem as they find it difficult to clean it. Finding good quality lotus stem is not tough if you know how to spot the freshest ones. Look for the brightest looking sticks in this case.

Try and find fresh unblemished Lotus stem preferably locally grown as that ensures the freshness. The freshly cut end of a lotus stem should ooze a little milky exudation and should be creamy white in colour. Do not buy if the pores look dirty as it will be a big hassle to clean it properly.


You need to discard the brown ends and peel the skin using a potato peeler. Take care not to peel too hard as half the lotus stem will be wasted that way.

ingredients

lotus stem sliced in half moons or as convenient 2 cups
red onion sliced 1/2 cup
chopped garlic 1 tsp
ginger julienne 1 tbsp
dry red chillies broken 2-3 or to taste
star anise petals broken 1 tsp
tamarind pulp 1 tbsp (freshly made, 1 tsp if using thick ready made paste)
soy sauce 1 tbsp
grated jaggery 1 tsp
black pepper powder (optional)
sesame oil 2 tsp or 1 tbsp

preparation

Heat the oil and tip in the star anise petals, garlic and broken red chillies. Let them sizzle first and then add the sliced lotus stems. Stir fry on medium heat for about 5 minutes and then add salt to taste. Mix well.

Add the sliced onions and ginger julienne. Mix well and cook for a couple of minutes.

Mix the tamarind pulp with soy sauce, grated jaggery and black pepper powder (if using) and pour into the pan. Mix well and let the lotus stem slices coat well.


Serve warm or at room temperature. This is something we can't take our hands off, it is so addictive you would finish the plate as it is. Add a few roasted peanuts and it would make a complete meal. We had it as a starter the other day followed by a nice grilled fish.

This warm salad with lotus stem could be a great accompaniment to any noodle or rice meal that you plan for an oriental dinner.

One of those dull looking but yummy dishes that you keep repeating for the ease of cooking and the taste.


Monday, September 15, 2014

review : a confluence of coastal cuisines at Kitchen District, Hyatt Regency Gurgaon


It was a hot and sultry day when it rained as a flash for almost an hour. The much needed rain felt like a spoiler as I was planning to go to the other part of the town to taste the spread at the Kitchen District, Hyatt Regency Gurgaon. The drive took more time than usual but I was reading a book on the way so it did not feel too much. I was hungry by the time I reached and found myself surrounded by many kitchen counters representing coastal cuisines from all parts of the world.

Coastal cuisine doesn't always mean seafood as Chef Adam rightly said while introducing us to various kitchens spread over the huge dining area. The whole dining area is divided into small niches for different moods and time of the day. One can choose to sit anywhere and eat from anywhere and it was this concept that made Kitchen District feel like a great holiday option or even a weekend meal.

We started with a Chicken meat ball Yakitori and a sweet potato Yakitori and I loved both. The sauce felt perfect to keep dipping new bits of meat ball as I was really hungry.


A Focaccia was served with a topping of mashed aubergine, feta cheese, sun dried tomatoes and micro greens. The toppings were yummy but the bread was a simple bun not a focaccia. I have a problem when non edible herbs (leaves) are used for garnish. I found one on this one, an ornamental Asparagus.

I loved the simple clean honest lentil soup that came with a pita bread with sumac sprinkled on it. I had some more sumac in the lentil soup and it was such a comfort food. Superb presentation too.

I loved the pasta with string beans as well. A little sprinkling of Parmesan and olive oil made the pasta really good. Well balanced.

The Stuffed tomatoes with couscous was nothing notable. I did not like the Tofu and spinach with soy sauce. The spinach tasted bitter and tofu was bland.

But Crispy fried pork had a mind of it's own. It was really good with hints of star anise, sweet and sour sticky bits of fried strips of pork. I quite liked the black pepper prawns as well. Rightly done fresh prawns just as I like them.

The best part is that the Kitchen serves fresh hot sticky rice with all meals as a complementary offering and the rice is served out of a traditional bamboo basket.


Lamb with cabbage tomatoes and peppers was good too. Could have tasted great with the sticky rice but I did not try.

The best flavours came from the Chettinad kozhi curry with prominent aroma of coconut and southern spices. Loved the Neer dosa that came with it. There was a neat looking egg paratha but the egg stuffing was just too salty.

The Chettinad kozhi and neer dosa is worth it's salt. Great work by Chef Senthil. Really well done.


What I liked for dessert options is the lavish display of various options one can choose from, the spread included fresh fruits, cocoa covered almonds, candies cashews, various fruit and chocolate sauces, marshmallows and macaroons etc.

One can get a personalised dessert made on the counter adding whatever one fancies that day. Makes so much sense if you want to have some control over what you want to eat.


I liked the raspberry sorbet that I tried and some fresh pineapple juice. I tasted bits of a few more desserts but I am not a desserts person and none could impress.

We had already had so much food to taste and it was getting late. Now after a hearty lunch I was reminded of the book I was reading. I had almost an hour to read on the way back.


Wednesday, September 10, 2014

why not to use artificial sweeteners? A recipe of parippu pradhaman muffins using unrefined sugar for Indian soul


I know sugary food is often called soul food, it quenches a different kind of thirst, calms down the nerves etc etc. To me that happens only when the sugary treat is home made. Else it just keeps corrupting insulin response and the soul connection is a farce, absolute absurdity. I don't say I don't ever eat ice creams or jalebis but I don't feel a soul connection, rather a generous mouthful makes me feel sick from inside. We eat things for social occasions sometimes, to eat for satiety one needs to work a little extra. Bake some dessert of your own when you really want it and use unrefined sugars or other natural sweeteners.

I see people all around me using artificial sweeteners into their tea, coffee, cakes and pancakes almost everyday. I wouldn't go into details of why artificial sweeteners are bad for the system but it will be good to know that all artificial sweeteners are addictive and have much harmful effects than real sugar. So if you are not diabetic (or if the diabetes is under control, going by your hbA1 readings) and are just trying to keep your weight under control, it is better to have very lightly sweetened beverages and other eatables using real sugar or raw sugar or jaggery rather than depending on artificial sweeteners. You must know even diet soda is addictive for the same reasons.

Having said that, I must add that if you are craving sweets as a habit, it means your insulin has started taking your 'hormone cascade' hostage or has already done it. And mind it, this can be the case even if you are not diabetic. Corrupt insulin discipline in the body doesn't always mean onset if diabetes. It could lead to insulin resistance or hypothyroidism or in a habit of binging and storage of fat in your body, even if you have been eating low fat foods and low cholesterol or 'cholesterol free' foods.

The question I am often asked is, what to eat? I ask, is sugar the only food and sweetness the only taste that makes sense? Why not some zing in the life? Sweetness in the excessive measure corrupts the taste buds and makes your body crave for it more, causing serious imbalances as I mentioned above.

Craving for sweets and cakes is a bad sign, get rid of it.

And if you want to wean yourself from too many sweeteners or you want to bake an occasional treat for a diabetic person in the family, why not bake using natural sweeteners?

 There are a few natural sweeteners and unrefined sugars I use frequently and never feel like adding sugar to my cakes or pancakes or cookies. Yes jaggery and honey are good natural sweeteners but these two need to be used in small quantities to make mildly sweetened dessrts

Other great natural sweeteners are ripe bananas, date paste, figs paste, chopped or pureed prunes, apple sauce, sapota puree, raisins and currants, sweet apricot puree, roasted peach puree and mango puree. One can add these to the recipe for baking cakes or cookies and drizzle them with very little honey or home made fruit preserves and the food will be naturally great tasting. The sweetness will be more complex and satisfying and the GI value of the food will be lower, helping your system not to fall prey to craving.


And now coming back to the recipe which is sweetened with unrefined sugar and can be lower GI than a 'white flour artificial sweetener' cake or muffin. Calorie count will be a bit high but being low GI this small muffin would keep you full for quite a long time.

This is my baked rendition of a famous Onam recipe from Kerala called Parippu Pradhaman. Yes, we can bake the traditional puddings that we have grown up loving. Parippu Pradhaman is traditionally a low GI, gluten free desserts but baking makes the recipe convenient for those who are away from home and traditional cooking is not as convenient. This recipe takes 25 minutes to prepare including 20 minutes of baking time. Just 5 minutes to assemble and mix the ingredients. Believe me.

ingredients
(6 muffins)
mung bean flour or chickpeas flour 2/3 cup
powdered jaggery or unsulphured sugar 1/3 cup
coconut milk 150 ml or 2/3 cup
dehydrated coconut chips 1/2 cup
chopped cashew nuts 2 tbsp

preparation

Dry roast the mung bean flour for about 5 minutes. If you don't have mung bean flour you can powder yellow mung dal into a sturdy grinder and proceed. Else us chickpeas flour (besan) but that would compromise the taste.

Mix everything together, saving a few chopped cashews for garnish and make a thick batter.

Pour equal amount of batter in 6 ramekins or lined muffin tray. Sprinkle chopped cashew over these and bake in preheated oven at 200C for 20 minutes.

Serve plain or drizzled with coconut milk. The aroma in the kitchen will just be like you were cooking the traditional parippu pradhaman. Always serve warm although it tastes good even when at room temperature.

You can see this recipe doesn't need anything that needs too much work. Fresh coconut can be used and would result in a better taste but using dehydrated tender coconut chips is not bad.


The chopped cashew nuts get browned and taste really good with the dry version of parippu pradhaman.

I have posted a baked version of traditional north Indian besan ki pinni where I use baking as a convenience procedure, the taste of the traditional pinni is not compromised.

Another baked version of a traditional Indian (north) dessert is baked sevaiyyan that is my effort to make Eed ki sevaiyyan more convenient for the modern kitchen..

Many Indian mithais can be converted into baked version for the ease of cooking as well as to control the amount of cooking fat and the sweeteners used. I even use Microwave oven to make an instant apple kalakand.

Hope you like this baked parippu pradhaman (muffin) as much as I liked them.

 
Healthy Way powered by blogger.com
Design by Free7 Blogger Templates Simple Clean