Showing posts with label low glycemic meals. Show all posts
Tuesday, March 29, 2016

Quinoa from Indian farmers : 3 recipes using Indian Quinoa


I never used Quinoa in my home cooking earlier because we always had Amaranth grains (pseudo grains) that make a much better choice if you consider the nutrient value available closer home. Imported Quinoa doesn't make sense when we have the super grain Amaranth growing abundantly in our country. Eating locally available food is not just to minimize the carbon footprint but also to support the local farmers who must get buyers for whatever they grow.


But then in the last few years Quinoa was tagged as a super food so aggressively that the prices skyrocketed and some Indian farmers started thinking of growing it too. Last year I got to know that CFTRI helped many farmers to grow Quinoa and I appreciate the initiative as the farmers do need some cash crops in their crop rotation cycle so they can sustain farming better. So when I virtually met a farmer who is growing and selling Quinoa, I bought some for myself and started using it frequently for my everyday meals.

I normally eat soups and khichdi a lot for my everyday meals and quinoa works wonderfully for such meals, just like any other millet or rice varieties. Quinoa cooks so quickly (20 minutes) and can absorb a lot of water while cooking, making it lighter for a meal. A cup of quinoa absorbs about 3.5 cup of water but can be cooked with lesser water if you want a bite to the cooked grains.


I normally cook half a cup of quinoa with a hint of salt and keep refrigerated for 3-4 days. Adding this cooked quinoa to my soups and other meals is so much easier.

Here I am sharing three ideas to cook healthy balanced meals with quinoa.

Quinoa and sweet potato burger 
______________________________

This sweet potato and quinoa burger is a meal in itself and you don't need any burger bun with this. But you can use it for making a vegetarian burger too.


I tried this recipe last year when I dug out a few of my sweet potatoes and loved it so much that it has become a regular at home. I have tweaked my initial recipe to get more texture and flavour into the burger and to make it easier to cook too. Incidentally this recipe uses up all the finger thin sweet potatoes that I dig from my garden.

I generally boil sweet potatoes with skin in pressure cooker in the night and let it stay on the kitchen platform (without opening the cooker lid) till next morning when I mash the sweet potatoes along with cooked quinoa to make the burgers for lunch. This saves a lot of time.

ingredients
(makes 6-8 burger patties)

1 cup of boiled, cooled, chopped and mashed sweet potatoes (with skin)
1 cup of cooked quinoa 
3 tbsp chopped walnuts
1 tbsp or more minced ginger
2 tsp minced green chillies
pinch or garam masala
salt and pepper to taste
1 tsp anardana powder (or use a little amchoor powder) 
1 tsp ghee or a little more per burger patty to be shallow fried 

procedure 

It is important to use cold (boiled) sweet potatoes for this recipe to get the right texture of quinoa burger patty. Boiled and refrigerated sweet potatoes and quinoa work really well for this recipe.

Mash everything in the ingredient list, adjust seasoning and make medium sized patties. Shallow fry on a hot griddle and serve with salad or as a part of the regular burger. I like crumbling some feta cheese over it and some onion rings too.

The burger patty made with sweet potatoes and quinoa is quite moist and has a sweetish taste that feels really good with walnuts and feta cheese over it. Some rucola does wonders to this meal too.


I served a little Star fruit chutney on the side that actually tasted great with it.

chunky Quinoa and tomato soup 
_____________________________

This is one of the soups that can be had hot or at room temperature. I have made it several times and it can accommodate some baby spinach, some zucchini, green peas or even some cabbage making the soup a wholesome satisfying meal. Of course it cooks within 20 minutes even if you cook quinoa and boil eggs on the side burners.


ingredients 
(2-3 servings for meal)

1/3 cup quinoa (cooked to become 1 cup)
500 gm ripe tomatoes diced in small pieces (with the skin)
2 tsp butter or ghee
5-6 fat garlic cloves chopped fine
1/2 tsp roasted chilli flakes
a spring of rosemary and a spring of Marjoram or any herb that you like
salt and pepper to taste
One hard boiled egg per serving 
spot of sugar to balance if needed

I usually add some more vegetables to this soup, in this version a small zucchini was diced and added. Adjust seasonings according to the vegetables you use.

procedure 

Heat the butter with chopped garlic and chilli flakes and let them sizzle for a few seconds. Tip in the diced tomatoes at once and stir to mix.

Add the salt and cook covered for a couple of minutes. Smash the tomatoes as they start softening.

Add the herbs and zucchini and cook till the vegetables are cooked and become mushy. You can liquidize everything if you want a smooth soup but I generally keep it chunky for ourselves.

Add the cooked quinoa, balance seasoning and add some stock or water if required. Simmer for a minute and serve hot with boiled or fried eggs on top, or reserve the cooked soup for later use.


Quinoa in coconut milk served with stir fried vegetables 
_________________________________________________


This coconut milk quinoa tastes really good with Thai herbs or with a south Indian treatment. This recipe is inspired by south Indian coconut milk rice.

ingredients 

3/4 cup cooked quinoa
1/2 cup coconut milk
2 springs of curry leaves 
salt and pepper to taste

for the stir fry vegetables 

500 gm vegetables of your choice
1 tsp sesame oil or ghee 
2 tsp sambar masala or to taste
salt and pepper to taste

procedure 

Mix the coconut milk with the cooked quinoa and simmer till thickened and sticky.

Heat the ghee and stir fry the vegetables with salt and pepper till done to your choice. Sprinkle sambar powder and cook till everything gets nicely seasoned and a little spicy.


Serve the stir fried vegetables over coconut milk quinoa and serve it hot or warm. I generally add some eggs to this meal too. Eggs are used a lot in my kitchen you can see. And there is always a large heap of vegetables on my platter too.

Hoping you will try these Quinoa recipes and will try and get local sources of quinoa and all the food ingredients that you use.

Tuesday, February 2, 2016

recipe of pickled radish and making paratha meals healthier | radish leaves stir fry on the side


Pickled vegetables may be the way you can include more vegetables in your everyday diet with much ease possibly. This is for those who hate eating vegetables normally.

You do consume a bit of salt along with pickled vegetables but you can adjust the salt at the time of serving by adding a few elements to balance.

Normally pickled vegetables shouldn't make the staple vegetable intake but since pickling in certain ways causes fermentation and makes the pickle probiotic by lacto-fermentation, it is worth adding some pickled vegetables as a side dish or even in salads to bring some punch.

What is more interesting to know that this way you get cheap home cultured probiotics and once you use some fresh vegetables and whole grains in the meal you feed some prebiotics to your gut flora too. A healthy gut flora is the key to good health.

Moreover, you can pickle almost all vegetables you get in any season and pickling can be an all year activity on your kitchen counter. Each season has something delicious to pickle. I will definitely keep posting more recipes of probiotic pickles for you all.


Right now the winter months bring these gorgeous red radishes and I love pickling them in so many ways. The mustard pickled radish is one of the favorite way to pickle the mature radishes, the tender ones go into this brined pickle that I love heaping my plate with.

You know this way one can balance the meals. I usually make methi paratha using millet flours (mostly a mix of sorghum, amaranth and barley flour) or I add some whole chickpeas flour to the mix sometimes. The paratha is always made in ghee and is served with some full fat home cultured yogurt.

See how in this platter I have combined the paratha meal with a roasted tomato and coriander leaves chutney, some yogurt, some amla subzi (recipe will be shared soon) and loads of pickled radish.
 

Paratha is anyways healthy if served rightly, but this millet paratha meal has so much vegetables and fiber from whole grains packed into one meal that it makes the meal low glycemic and safe even for those who want to manage diabetes or weight related goals.

Don't worry about the apparent lack of proteins in this meal as sorghum, amaranth and chickpeas are quite a good source of proteins for normal people. Yogurt of course fills in.

Recipe of red radish brined pickle 

ingredients 

3 large radishes (preferably red) almost 600 gm
500-700 ml water (quantity of water used depends upon how you chop the radishes and how packed they are in the jar)
1 tsp sea salt
1 tsp sugar
1 tsp whole peppercorns

procedure

Clean, wash and chop the radishes in batons. The batons can be according to the size of the jar you want to stack them into. Or slice them if you like. Stack the batons into clean sterilized glass jars.

Heat the water with the rest of the ingredients till it boils for a couple of minutes. Cool down to room temperature and pour over the radish batons stacked in jars. You may need more water if the batons are packed loosely.

Cover the lid and let the radishes pickle on your kitchen platform for at least 24 hours before serving. The taste and texture stays crisp for about 2 days but it depends on the temperature so refrigerate as soon as the radish batons start getting too soggy. It will still be edible when it gets soggy though.

Serve this radish pickle on the side of an Indian meal or with burgers if you like or inside sandwiches or any which way you like. You might end up munching on them as is.

A great way to consume this radish pickle is to add it to some salad. The pickling liquid will serve as a nice dressing too is mixed with some olive oil etc.

The leaves of the radish make wonderful stir fry that we love as stuffing to our parathas or chapati rolls. The recipe of the radish leaves stir fry is simple.


Recipe of radish leaves stir fry 

Just heat some mustard oil (or use any other oil you wish) and tip in some ajwain seeds (Omum seeds), broken dry red chillies and chopped garlic to it. Let them sizzle and then add the chopped leaves of radish. Add salt, mix, cover and cook till the volume is reduced. Then stir and cook for a couple of minutes till the stir fry gets a little dry. 

Add everything to taste, the mustard oil brings much flavour to this stir fry we call mooli ki bhurji. The best taste of this bhurji comes when you use red radish leaves but any radish leaves are good. Add some bits of radish too if you want more of this bhurji to savour.


All such leafy greens are great prebiotic foods and if consumed with whole grains and some proteins they make balanced meals.

You see when such parathas are made using alternative flours they can be a meal in itself. And when these paratha meals are served along with some of these probiotic pickles, some full fat yogurt and may be some more vegetables or chutneys or dips on the side they make a satiating and filling meal that keeps you full till the next meal and you don't end up snacking on nonsense things in between.


Oh and the leftover parathas once quartered and reheated on the griddle make nice tea time snack if you wish. eating healthy is not much of an effort if you plan ahead and keep the ingredients clean and simple.

So make your paratha meals healthier with these probiotic salads of the season. Add more vegetable in every meal and see how your body thanks you in return. Say yes to a big paratha meal any day.

Monday, January 11, 2016

recipe of beans and mixed greens salad and how to keep leafy greens fresh for longer and ready to use


Convenience is the most critical factor that comes in the way of cooking healthy everyday. We fall back on short cut methods, quick sandwiches, take-aways and home delivered food sometimes when we are occupied with work or just can't handle the housekeeping and kitchen both along with work. If you have young kids the convenience factor counts even more.

Being prepared, shopping for fresh greens weekly and keeping some boiled beans, potatoes, may be some chicken helps a lot when you want to cook or whip up quick meals. Paneer and eggs also help me a lot when I have to cook quick meals. We eat simple meals at home but it has to be tasty and different every time. I just cannot imagine eating the same things everyday, apart from some classics that we cook every season without fail.

I make sure we eat loads of leafy greens everyday but I am not too particular about eating them raw always. I would steam and sautee the greens sometimes, would puree and make dips or cook them into a delicious lentil soup.

How to keep leafy greens ready to use...

Someone on Instagram asked me how to keep the salad greens and other leafy greens fresh for a week in the fridge. I know it is a bit of effort if you want to eat fresh greens regularly. First of all you need to buy them regularly to keep them stocked always. I get to shop for my leafy greens once a week but one can buy 2-3 times a week if possible.

Now a days one can order salad greens online and schedule an alternate delivery to get them fresh always. But what to do when you get to buy them once a week. You have to make sure you process them and store them in such a way that you can use them in salads, stir fries and soups.


Now let's see how we can sort the greens, clean them (or not) and keep them ready to use for quick meals whether those are salads, stir fries or soups.

  1. Sort the greens by type so you can use them accordingly over the week. The lettuces, rocket leaves etc keep well for 4-5 days in the fridge, the spinach, amaranth leaves, Bathua, fenugreek leaves etc keep well for 10 days, the beet, carrot and knol khol leaves stay good for 4-5 days while the most long lasting leafy greens are the cabbages of all sorts. Think about the green or ed cabbages, Chinese cabbage, pok choi and radicchio etc, the ones that form a head. These stay fresh for a month or so if stored well. 
  2. For all salad greens, rinse them well, drain for an hour and pack into cloth or paper bags to refrigerate. For the first 2 days they stay fresh and crunchy so use them directly. If they get softer after a couple of days just tear them first and then dip in chilled water while you prepare the dressing and other ingredients of the salad. And if the salad greens have wilted beyond repair in the fridge blend them into smoothies or just blend and add them to lentil soups in the last minute of simmering.
  3. Spinach stays well for a week if it is kept wrapped in a paper or napkin. Choose freshest spinach possible and do not wash it before refrigerating if you are storing it raw. Spinach  should be chopped and cooked immediately after washing else it starts rotting. Baby spinach stays well even after washing and draining the leaves well. You can chop and steam spinach and freeze it in ziplock bags to be added to stir fries and to be blended into soups or to make palak paneer etc.
  4. Fenugreek (methi) leaves are a little dry and can be washed and chopped before storage. Keep the chopped, ready to use fenugreek greens in a ziplock bag (pierced to allow aeration) or a cloth bag. These will be great even if they dry up a little bit. 
  5. Amaranth greens (both red and green variety) keep well if washed and chopped, stored in a perforated ziplock or cloth bag. If kept unwashed these greens last longer as these are almost drought resistant greens.
  6. Bathua leaves I always wash, chop and steam before storage. Bathua (Chenopodium) doesn't keep well because of higher water content in them. So steam bathua and store, chop or blend when required.
  7. Purslane (kulfa) has high water content but it is a succulent type plant so it keeps well in the fridge for 2 weeks. It stays good even at room temperature for 3-4 days. 
  8. Fennel bulbs, leeks and spring onions keep well if the leaves are trimmed. Keep the leaves separate and use them first, the bulbs stay for longer. Keep them refrigerated in cloth bags or paper bags. Knol khol leaves are better cooked with the bulb like this Monji haak recipe, but keeping the greens separately helps in this case too. 
  9. Cabbages last quite a long time. The tighter the head of cabbage the longer it will last in the fridge. My home grown cabbages last about 6 months in the fridge, the ones from the market are already a couple of months old when they reach you. Do not wash the cabbages before storage. The good thing is that the cabbages do not require cleaning and can be chopped quickly before cooking or tossing into a coleslaw or chopped salad. 
  10. If you are getting mixed salad greens remember to rinse them first and store in a cloth bag or perforated ziplock, but not for more than a couple of days as some of the varieties of salad greens may spoil earlier and cause other to rot too. Dip them all in chilled water before tossing into a salad. I never use a salad spinner to dry the salad greens but I do let them drain in a colander for some time.
Last but not the least, grow some of the herbs and salad greens in whatever space you have. Try and find more leafy greens that grow wild around you and use them. In this salad you can see some Oxalic leaves that impart a tart bite to the salad. 

Coming back to this beans and mixed greens salad, I have used a native variety of cow peas in this salad which is a brown and smaller variety of black eyed peas. The taste is much better than the regular black eyed peas and it cooks faster too. In local parlance it is called as laal chowli or desi chowli or desi lobiya.


I keep using different types of beans for my salads or hummus or even stews. This laal chowli I find suitable for a stew as well. In fact I stir fried the boiled laal chowli with spinach and bathua (separately) and it tasted so good that I thought of making hummus with it too. The beans were boiled and stocked for making quicker salads for my lunch though.

ingredients 
(serves 2 for a full meal)

1 cup boiled laal chowli (lobiya) or black eyed peas (or use any beans you like)
3/4 cup black grapes halved (or use orange segments)
3-4 large cherry belle radishes thinly sliced or beets thinly sliced
300 gm mixed salad greens torn into bite sized pieces
I used a few oxalis leaves (khatti buti) for a tart bite
2-3 tbsp chopped walnuts

Few pieces of thinly sliced toasted bread (preferably multi grain or whole wheat)

Dressing 
1 tbsp lime juice
2 tsp or more extra virgin olive oil (or use mustard oil)
2 tsp tahini paste (or use sesame powdered fresh)
salt and pepper to taste
1/2 tsp minced garlic (2-3 cloves)
2-3 black grapes crushed

preparation 

Make the dressing by whisking everything together.

Add the boiled beans (room temperature) to the dressing and toss with the mixed greens, radish slices and chopped grapes or orange segments.

Sprinkle with chopped walnuts if using.


Fill into a salad bowl and arrange the toasted bread slices to one side. Drizzle with a little olive oil and serve immediately.

This salad is a fine balance of flavours and textures. The black grapes give it a sweetish flavour that enriches the dressing so much I felt like making the salad again and again. I used orange segments the next time when I used red cabbage for the salad and it was as good.

Do not skip radish in this salad as it gives a nice crunch, you can add thickly grated or julienne of radish if you want.


Saturday, September 26, 2015

egg scramble with garlic chives and sorghum flour pita bread recipe | desi super foods for everyday


A simple regular egg scramble takes about 5 minutes to make and a millet based pita bread can take another 10-15 minutes depending on your roti making skill. Blending pomelo segments to make a smoothie-juice takes another 5 minutes, including cleaning your blender. In about 20 minutes a super food breakfast can be whipped up and this platter of egg scramble with loads of chives and rucola, sorghum pita bread and pomelo (grapefruit) smoothie was our weekend late breakfast last week.

Wondering why I am talking about super foods so often these days?

I know you have questioned the relevance of super foods and have wondered about what foods are super foods and which ones are 'just regular food'. High time we analysed our 'just regular foods' and took a hard look on super foods. Don't you think we need the so called super foods more because we have fallen for junk foods? The more we eat junk foods the more we feel like compensating with some super power..err..super foods.

And lo and behold, the same markets that trapped us into the 'junk food' addiction, are shoving super foods down our throats. And we end up eating the extra large sized junk burgers, gripped by guilt later we buy a pack of some newly introduced (to our part of the world) berries and seeds and try and undo the burger guilt. Oh and we overlook everything else that might have been on our table in a normal way. The 'just regular food' that may be equivalent to the newly crowned super food is often ignored as there are stronger market forces pushing us towards a certain new product.

But the good thing is, we can decide better.

It will help to know that using herbs and some spices can boost up the super food quotient of any 'just regular meal' by several notches.


Here are a few ways you can make a regular meal antioxidant rich, and get it qualify as super food.
  • a pinch of clove powder has enough antioxidants as a handful of berries. Add it to your regular banana smoothie if you don't have blueberries. See this to believe.
  • adding some basil or tulsi leaves to the smoothie or salad would be even better than blueberries. 
  • a generous dash of black pepper would help absorb nutrients better and make a regular bowl of vegetable or fruit salad much more nutrition efficient.
  • amla or Indian gooseberry blended with ginger and curry leaves in a glass of buttermilk is packed with super foods of different categories. 
  • Think of turmeric, ginger, fenugreek, regular curry powder and even green chutneys and how these have been making Indian meals healthier for centuries. 
  • some very easily available leaves like curry leaves, drumstick leaves, purslane, sweet potato leaves, beet leaves and even turnip and radish leaves are full of antioxidants and minerals that one finds in expensive imported berries and exotic leafy greens. 
See how easily drumstick leaves combine with scrambled eggs to make a delicious meal in a hurry.


The egg scramble I am sharing today is made using garlic chives and rucola greens from my garden. It could be simple coriander greens or spring onions or even a generous amount of ginger and garlic, some freshly milled pepper to make the mundane egg scramble more nutrition efficient.

And once you pair this breakfast with a millet bread it become better, a glass of grapefruit or citrus juice makes it even better. If not juice it could be this amla infused buttermilk.


Recipe of the creamy and herb loaded egg scramble..

ingredients 
(2 servings)

4 eggs
1/2 cup chopped garlic chives
1/4 cup rucola leaves  (or use coriander greens or spring onions)
1 tbsp or a bit more roughly chopped mature cheddar
salt and pepper to taste
3 tbsp milk (you can use butter too)

procedure..

Pour the milk in the pan first, break the eggs directly in the pan and dump in all the ingredients together. Whisk a little, lower the heat to minimum and cover for a minute or so.

Uncover, scramble the soft set eggs till it reaches the desired consistency. Serve immediately.

I used to cook my egg scramble in milk during my research days when I would teach in the early morning hours and then would reach the lab around 9 AM. I would buy milk, eggs, bread and fruits for on the way and cook a quick egg scramble with bread as soon as I reached my lab. Since this was cooked over a simple heater with minimal ingredients and utensils I used to add milk to eggs and quickly stir to scramble them. That became my favourite method to scramble eggs later. My sandwiches were famous among my lab mates by the way.

Recipe of the jowar (sorghum pita)..

ingredients..
(makes 2 large round pita breads, enough for 2-3 servings)

a cup of jowar flour
1/2 cup of yogurt
pinch of soda bicarb
pinch of salt
a cup of hot water

procedure

Add salt and soda bi carb to the flour and whisk to mix. Pour the yogurt and whisk again as it becomes a crumbly dough.

Now add hot water slowly and knead a soft dough while massaging the dough in quick movements.

Heat a griddle, divide the dough into two parts, roll out a flat bread between 2 sheets of cling film or pat a thick roti using your palms. I do just that.

Slap the roti on hot griddle and let it cook both sides. The roti (flat bread) would come off the hot griddle as soon as it cooks, if it keeps sticking to the pan it means it is yet to cook. Give it come more time and it comes off.

Bake it some more over open flame and cut into wedges of halves as per convenience.

Alternatively, the rolled out roti can be baked in the oven till done. On the griddle it takes hardly 5 minutes but in the oven it will take about 25 minutes to bake.

Any leftover jowar roti or pita bread can be crumbled with ghee and jaggery to make instant dessert, the peasant way.

High time we started eating the peasant way.


Friday, July 31, 2015

lunch boxes for adults : assembling lunch boxes if you are a rice eater and announcement of the giveaway

With this lunchbox series I got to learn that there are many people who like eating rice in their lunch boxes too. Most people in north India prefer a roti subzi kind of lunch box meal but an occasional rajma chawal, chhole chawal or tahiri is not uncommon.

I love my rice too by the way, and I find it way lighter than the rotis for a meal. Personally rice makes me satiated faster and I need very small amount on my plate. For everyday meals even roti is needed in small serving as we make multigrain rotis always and those are quite filling too.

I observed in some regions rice is such a staple that the plate is full (*read heaped) of rice with just a little amount of vegetables and lentils or meats. All those who have grown up eating that kind of meal find it really tough to balance a rice based meal in adult (*read desk bound) life.

When you are young and active, play some sports you can have a lot of rice and other starches but once you are desk bound, office going and sitting long hours on a chair you better mind your rice and roti both.

So here are a few lunch boxes with rice meals where about 2-3 tbsp of cooked rice is used to make a satisfying filling meal. Balanced rice meals for a desk bound adult, eat more if you run marathons.

All these lunch boxes are gluten free by default.

1. Eggs and vegetables fried rice...

lunch boxes for adults

This kind of lunch box is made in my home when in a hurry. Leftover rice (2-3 tbsp per serving) is used to make it a 10 minute meal.

For 2 servings fry 1 cup finely chopped cabbage, 1 cup chopped onions along with chopped green chillies (or capsicum too) and 1 tbsp butter or ghee. Add slat and pepper when the vegetables are translucent, break 3-4 eggs and scramble lightly. Add reheated (in microwave or steamed on the other burner) or freshly cooked rice and mix well, fluffing up the rice as you mix. Add chopped coriander greens or rocket leaves ( I used rucola from garden) or spinach leaves and pack. Some pickle or raita is good to pack along. 

Find karonde ki subzi recipe here.

2. Methi matar paneer tahiri for lunch box...

lunch boxes for adults

This Tahiri is a 15 minute meal. One of those meals where you just dump everything together and make a tasty meal, suits me in the mornings when I get up really late.

Two-three tbsp uncooked rice (rinsed), a cup of finely chopped cabbage, 1/4 cup dry fenugreek leaves (these are home grown and sun dried but use kasoori methi if you don't have this), 1/2 cup frozen peas, some paneer cubes (I use about 3/4th of a 200 gm pack), salt, pepper, cumin seeds, turmeric powder and 1 tbsp ghee is dumped into a pressure cooker. 3/4 cup water is added and the mix is cooked till the first whistle blows. Cool, open the lid and pack along with raita/pickle and yogurt or buttermilk. 

It is better to pack some kachumber type salad and pickle with this one.

3. Lemon rice with millet for lunch box...

lunch boxes for adults

This lunch box takes about 30 minutes to assemble.

Barnyard or Prosso millet is cooked just like rice, then tempered with ghee, asafoetida, cumin seeds, mustard seeds and loads of chopped curry patta. Turmeric is added to the tempering along with chilli, then it is mixed with the cooked millet, seasoning it well. Add loads of lime juice to make it as tart as you wish.

I packed a quick vegetable stir fry and some karonde ki subzi with it along with roasted peanuts to sprinkle over the millet meal. Buttermilk is a must with this.

4. Multigrain khichdi for lunch box...

lunch boxes for adults

Earlier I used to have these multi grain khichdi for lunch almost 3-4 times a week. Now I manage about once a week and sometimes the husband also agrees to have it. He generally doesn't like khichdi but those who love khichdi find it really tasty.

This multi grain khichdi is made with 1 tbsp each of Red Kerala matta rice, barnyard millet, urad daal, chana daal and masoor daal along with 3 cups of chopped marrow and the usual khichdi seasoning and tempering. I make it a point to have a vegetable mash with it, parval ka chokha fits the bill in summer months. Karonde ki subzi makes it delicious.

5. Dal chawal meal in a lunch box...

lunch boxes for adults

I crave for hot daal chawal meals sometimes. I have grown up eating dal chawal almost every single day and whenever I manage to make dal chawal with some bhujia I feel really happy. This is a rare lunch box for both of us but we love it a lot.

Peeli daal cooked with arhar (pigeon pea) sourced from I Say Organic is so good to taste as it is unpolished and some of the husk is still attached, giving it a earthy taste. For quick meals I just pressure cook the daal with salt, turmeric powder, pinch of asafoetida and little ghee and serve it without tempering with a little more ghee.

For lunch box I mix the daal chawal and add some bhujia on the side. Kachhe kele ki bhujia or parval ki bhujia is favored with our daal chawal meals. Some diced cucumbers and yogurt make this meal light yet satisfying.


6. Curry and rice for lunch box with lotus stem curry...

lunch boxes for adults

This is bhien ki besan wali subzi (lotus stem in chickpea flour spicy gravy) which has become a favourite and we like it even for cold meals.

Topped over plain boiled rice, a generous amount of this subzi makes a delicious meal if you love curry and rice.

7. Curry and rice lunch box with ridge gourd curry...

lunch boxes for adults

This would become one of your favourite meals too trust me. The Bengali jhinge posto curry is one of the most favourites of mine. The gravy is made using poppy seeds paste but you can make it using mixed seeds (melon and sunflower seeds) paste too if you don't get poppy seeds in your part of the world.

Plain boiled rice and this protein rich curry is good enough, I packed a boiled egg salad with it just in case.

8. Curry and rice lunch box with marrow chaman kaliya (Kashmiri paneer curry)...

lunch boxes for adults

I love chaman kaliya and have learnt to add marrow to it to make it a one pot curry. This way I don't need to cook or serve any other greens on the side. Poured over plain boiled rice this curry tastes great even when cold. I love loads of this curry with a little rice. Nothing else is needed.

Chaman kaliya is made using either milk or whipped yogurt so I don't serve yogurt with it. It is a complete meal in itself. Will share the recipe soon and link it here.

9. Cabbage and sesame fried rice for one pot lunch box ..

lunch boxes for adults

This is another 10 minute meal if you have the chopped cabbage and spiced sesame powder. Saute loads of chopped cabbage and chopped onion along with some curry leaves, then add the sesame spice powder and cooked rice. Mix well and pack.

10. Chhole chawal and rajma chawal meals in lunch box...

I can't sign off this post without mentioning my absolute favourite rice meals. Rice and beans are popular in many parts of the world and cooked in different ways. Chhole chawal and rajma chawal are favourites since childhood. We like is spicy.

lunch boxes for adults

I like serving some mashed boiled vegetables or steamed vegetables with chhole chawal, and parval ka chokha appears once again.

With rajma chawal there is okra stir fry and cucumber onion pineapple raita.

lunch boxes for adults

Note that the portion of chhole and rajma is more compared to rice and the side serving of vegetables is also generous. Making the meal balanced is not that difficult.

Balance it in the next meal if you missed something in this meal I say.

lunch boxes for adults

This lunch box series was quite exciting for me. Yes a lot of work also has gone into it, I would never have clicked pictures early in the morning after preparing lunch boxes and packing off the husband to office.

Although all the lunchbox pictures are shot in a couple of minutes before fitting the lid on, I did make some effort to take those to a well lit area and reflect the light too. It was good fun. I wanted a post on snack boxes too but we have run out of time as I had promised to announce the Giveaways in July last week. I am doing so just in the nick of time.

So the winners for the giveaways of this lunch box series are ..

  1. The Tupperware steamer goes to Suranga Date
  2. The three layered handpainted lunch box from ToveIndia goes to VJ Sharma 
  3. Two sets of the steel containers with plastic lid go to Piyush Verma and Nirupama Sunder 
  4. A set of two glass bottles fit for carrying buttermilk goes to Navneet
Please provide your mail id in a week so I can inform you about the giveaway if you are reading this. I assume you follow my blog to get this notification too. I will wait for a week before doing another draw to chose another winner if you don't claim yours.

Thanks you for being with me on this journey. Hope you enjoyed it as much as I did. I will keep sharing ideas about lunch boxes whenever possible, your feedback is always very encouraging.


Thursday, June 11, 2015

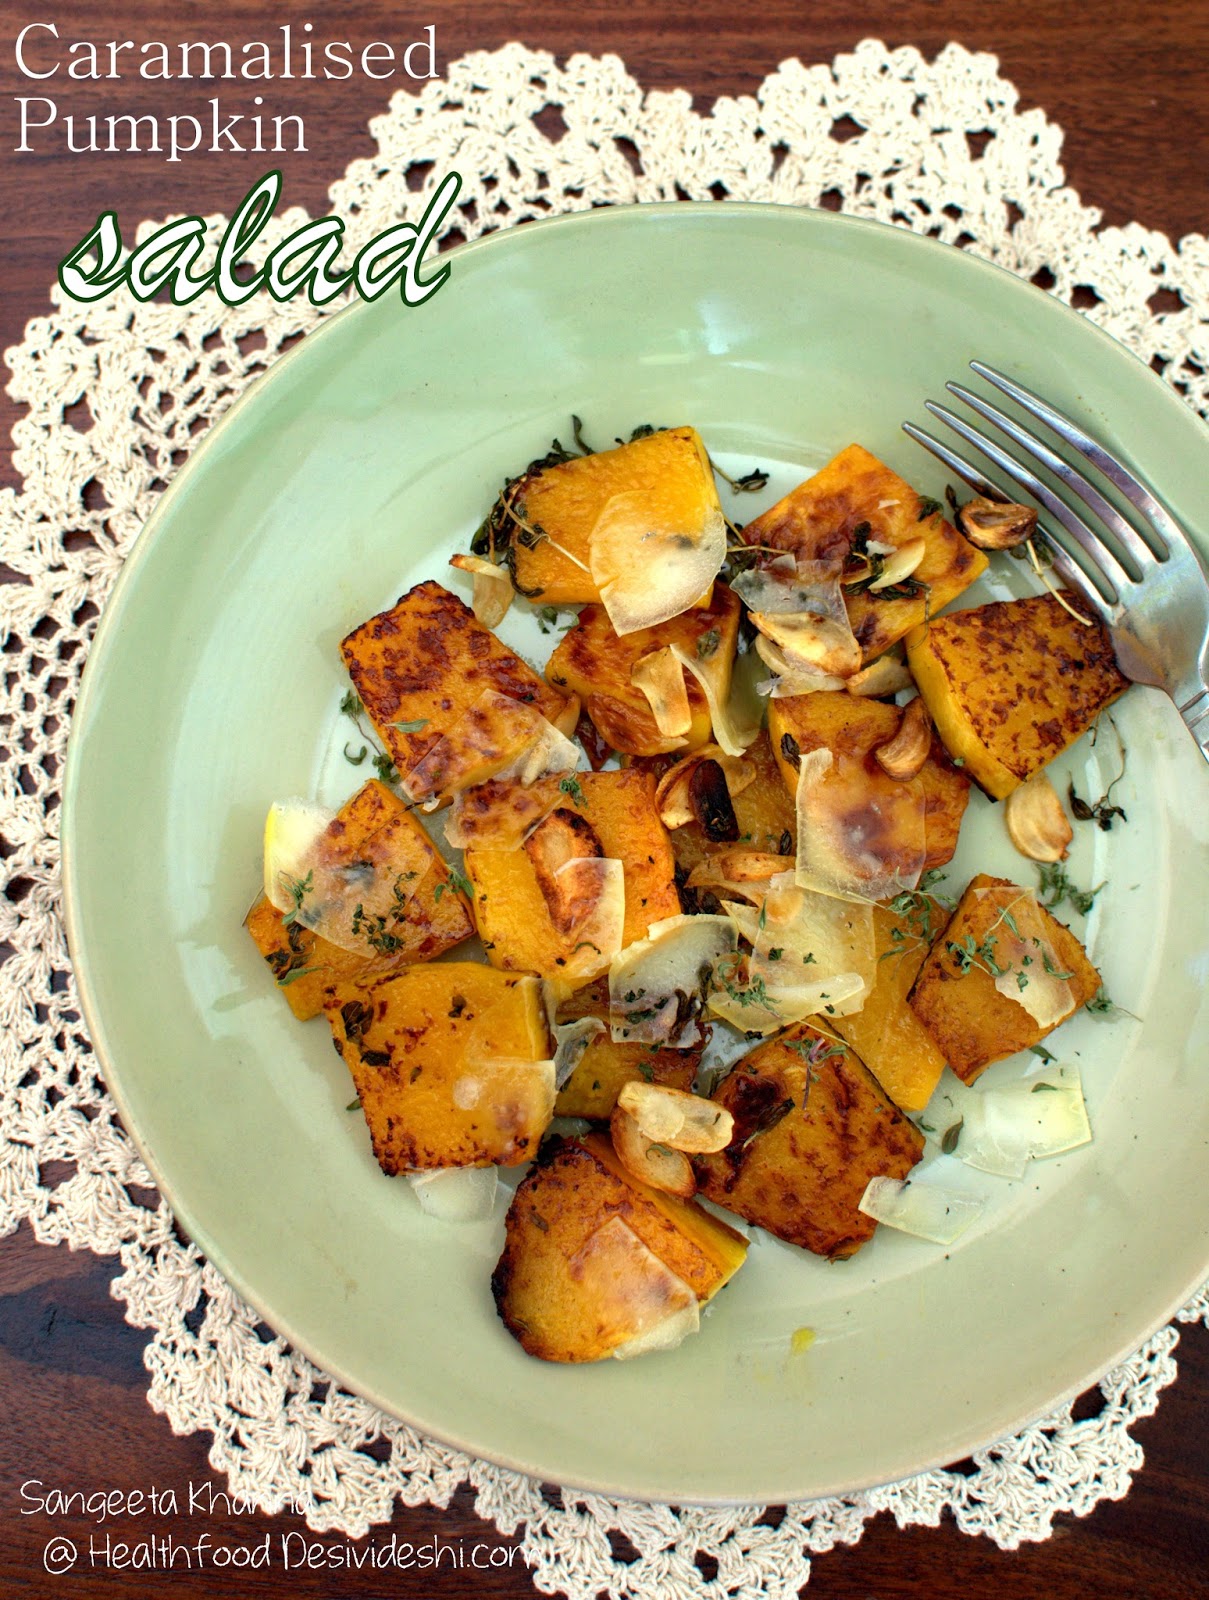
recipe of REAL food, some Magging and a pumpkin salad | caramalaised pumpkin salad with garlic-thyme butter and cheddar shavings

Yes there is a recipe of REAL food. And the recipe to real food needs a lot of unlearning, a lot of un-conditioning in modern times. The 'food markets' have conditioned us so much that we started thinking of food differently, we don't recognize an eggplant or pumpkin as food anymore and the 'dead' noodles coming out of a cheap packet is perceived naturally as the yummiest most desirable 'food'.

Caramelized pumpkin packs natural flavours, would it appeal to the palates paralysed by MSG laden 'tastemakers'?

pumpkin salad with garlic-thyme butter and cheddar shavings

Just think about the number of people who wouldn't feel hungry by the name of pumpkin and a packet of Maggi will make them hungry instantly and will bring back loads of 'happy memories' that they made in hostel rooms and mountain holidays.

Just imagine what Maggi has done to their growing up years not to mention to their system. They don't even realise there are chemical reasons behind this 'feel good addiction', the way a cheap small pack of instant noodles has clouded  and hijacked their sense of taste and satiety.

I have been watching some discussions and jokes about Maggi and MSG on social media lately and it leaves a bad taste in my mouth every time someone proclaims MSG is a natural component of many natural ingredients. See this facebook discussion to know how some people spread more ignorance about the facts. No wonder MSG has become the common salt in almost every home and street food vendors have been using MSG to make even sambar, daal and chhole tastier.

Maggi and their ilk have garnered such a following that people are not even believing reports from Govt. authorities regarding other toxic chemicals found in them, limits permissible or not. And then they claim that everything edible natural food also has some or the other toxic component. But is that equal to junk food being laced with toxins too?

The most frustrating discussions and arguments came from people who were comparing Maggi with pesticide ridden vegetables and even alcohol, nicotine and even spurious medicine. As educated and aware consumer we must know pesticide ridden vegetables and fruits are a different matter on it's own. Nicotine and alcohol are not even distantly related to the issues of junk foods that our bodies haven't even known as food.

All these convenience foods that have been made 'hyper-tasty' with the help of several chemicals including MSG, more chemicals go into them to prolong the shelf life. These food like objects find place on our tables and in our lives through a very strategic marketing that involves clever advertising and placement of the shiny packets on supermarket isles as well as the corner grocer of the colony.

Maggi and it's ilk creeped into our kitchens stealthily, hijacked the sense of taste and satiety so much so most of us started rejecting real food. And many of us even started arguing to defend Maggi.

True that Maggi has not killed anyone that the arguments are saying, but we can't be this shortsighted to ignore the metabolic disorder that is fast becoming an epidemic. Young innocent kids are getting diabetic and obese, adults develop multiple hormonal imbalances even before they reach middle age. I wonder why many of us do not realise that our body is equipped to heal itself if we stop eating trash and start nourishing it with real food.

Many said that they eat Maggi 'only occasionally' for a 'rare treat'. Just imagine Maggi being called a 'treat'. The trash being called a 'treat'. Need I say more to emphasize how Maggi and it's ilk has hijacked the sense of taste and satiety in today's world?

Aren't there real noodles tossed with real ingredients to make a tasty meal?

noodles

I wish a trend starts when there are fresh noodle makers just like the bread bakeries around towns, we already have dosa and idli batter makers who sell ready batter for everyone's convenience, the fresh noodles made with real ingredients will be a welcome business venture. One can use their own seasonings, sauces and vegetables to cook their own favourite concoction. That kind of real noodles will be better even if they are made of white flour, at least one would be saved from the load of chemicals.

Just do away with fabricated food friends. Period.

And now a recipe of REAL food, the kind that wouldn't even appeal to the 'tastemaker' addicted palates and minds. But I hope they try it sometime and know how pumpkins can pack more flavours than they imagine. All of you who come to find real recipes here know it already :-)

Caramalised pumpkin pan grilled with thyme-garlic butter, served with cheddar shavings ...

pumpkin salad with garlic-thyme butter and cheddar shavings

Just imagine firm yellow pieces of pumpkin being slow braised in a pan along with butter and thyme, some large slices of garlic that turn crisp by the time the pumpkin gets nicely caramelized both sides. The flavours seep in so well that no tastemaker can replicate this.

Choose a ripe pumpkin with tough flesh, orange yellow in colour and almost brown skin. Slice the pumpkin, peel off the skin and chop the flesh into bite sized fat slices. Get started to make this delicious salad.

pumpkin slices

ingredients...
(2 large servings or 6 servings as a party starter )

about 2 dozen bite sized fat slices of pumpkin (400 gm)
thyme leaves 3-4 springs
butter 1 tbsp
sliced garlic as much as you like ( I used 4 fat cloves)
salt to taste
mature cheddar cheese to shave over the cooked salad ( I used a small leftover cube)

procedure...

Grease a flat griddle with butter and arrange the pumpkin cubes and garlic slices over it. Sprinkle with salt lightly, sprinkle half the thyme leaves too and let the pumpkin pieces grill slowly on low heat. I prefer covering the griddle with a domed lid for this.

Turn over the pumpkin slices and sprinkle the other half of thyme leaves. The addition of thyme leaves at different phases of grilling ensures the flavours seep in really well. The garlic slices will start browning slowly alongside.

Cover again and let it grill and caramelize. Poke with a sharp knife to know the pumpkin has softened to your preference. The surface should be nicely caramelised and spotted.

pumpkin salad with garlic-thyme butter and cheddar shavings

Arrange in a serving plate and shave mature cheddar over the hot pumpkin slices and see the cheese shavings melt.

Dig right into it and see how it surprises you if you haven't loved pumpkin ever.

For party starters this salad can be served with some cocktail sticks or small forks so the guests can pick up he pumpkin cubes easily from a platter. Avoid serving it in a deep bowl, always a wide shallow platter.

Eat real food, forget Maggi and forget all reconstituted foods that come in shiny cheap packets. Eat local and seasonal vegetables and fruits and see how you get more nutrient value for your hard earned buck.

Friday, May 29, 2015

recipe of millet pongal live from the millet workshop | millets are for everyone, use them everyday


Millets are tasty grains. Trust me when I say this. The only reason why you might have had a lukewarm experience with millets is that our cooking procedures have tuned in so much with rice and wheat that we have forgotten how to cook millets well.

And no, there is nothing elaborate about cooking millets, it is actually simpler. We often make the recipes so complicated and overburden the ingredients with seasonings that the dish gets killed. Millets need simpler treatment, simpler seasoning and fewer accompaniments in my experience.

I am sharing the recipe of a very simple millet pongal made with Foxtail millet (kangni) and Mung daal (skinned yellow mung). Pongal is a savoury porridge that is a popular breakfast dish in the south but rarely made with millets. Pongal is also a popular temple prasad and I have had the best pongals of my life as prasad (offerings made to God and then distributed to everyone).


I made this pongal for the participants of the workshop I conducted at Our Sacred Space in Hyderabad, with a theme 'Millets for everyone, for everyday'. The objective was to introduce the participants about how and why millets are better than wheat and rice for our own health as well as for the health of the planet and agriculture practices. The bunch of participants was a joy to interact with.

I wanted something tangible for the participants at the end of the workshop so they could get a taste of what we talk about. I had made some multi grain panjeeri, some ragi crackers, Jau ki ghaat and jowar banana pankeas and a millet pongal was planned as live cooking. While I was confident about everything else, I felt really nervous about the pongal as this was one dish that I have not grown up eating and cooking it for people from Andhra was like a vegetarian talking about fish to a Bengali. Yes I was nervous for the pongal.

This is a phone picture of the cooked pongal to which I added tadka in a huge pot. The pongal was made for 40-50 people.


It was a pleasant surprise to know that everyone loved this pongal and took second and third helpings. The second thing everyone one loved was Jau ki ghaat because it was the right season for such a drink, although panjeeri, pancakes and crackers were all favourites. Panjeeri made an instant fan following there with people asking for more, saving some for themselves too.

Pongal made me happy for obvious reasons.

The feedback I got for this millet pongal was that they couldn't believe it could taste better than rice pongal. I was exhausted by the end of the workshop that lasted 4 hours but I did taste the pongal so I can recreate the same in my own kitchen later. But honestly speaking, when pongal is made in larger quantities the taste is better for some reason. You might be familiar with the belief that prasad pongal always tastes better.

Recipe of millet pongal (the way I cooked for the millet workshop) 

ingredients 
(40-50 servings with other side dishes)

Foxtail millet (Kangni) 1 kilo
split Mung daal 1 kilo
water 7 Liters
chopped green chillies 1 cup
chopped curry patta 1/2 cup
salt 1/4 cup, add more after checking the salt balance once the pongal is cooked
ghee 250 gm
asafoetida powder 1/2 tsp
cumin seeds 2 tbsp
whole red chillies broken 10-12
whole pepper corns 1 tbsp
cashew nuts 250 gm chopped

procedure 

Rinse the mung daal, drain and tip in to the cooking vessel. I used a large (12 Liter capacity) pot for cooking this pongal. Add the water and the salt and place it on stove. Let the mixture come to a boil, lower the heat and let it simmer for 20 minutes.

Rinse the millet, drain water and tip in to the cooking pot. Let it come to a boil again and simmer for 30 minutes. You might need a little more water if the consistency is too thick. Add the chopped green chillies and 1/3rd of the ghee, mix well and let it simmer for a few more minutes.

Now heat the ghee in a pan, add the asafoetida, cumin seeds, red chillies, pepper corns, curry patta and cashew nuts in that order and let them all get sizzling. Let the cashews get a bit brownish, the curry patta will also be fried nicely by this time. Add this whole mixture to the cooked pongal, mix well and keep the pongal covered. Serve while the pongal is still hot. This huge pot of pongal was hot for a couple of hours.

Here is a picture collage of iphone pictures my friend Bhavana clicked. There were a few organic farmers at the workshop and some people who wanted to know more about millets and their uses.


This workshop was organised and held at Our Sacred Space, brainchild of Nayantara Nandakumar who works tirelessly behind this beautiful space and its working. She has transformed her huge garden into a retreat, a mindfully done oasis of peace. Outdoors surrounded with beautiful plants, walls finished with mud and red oxide flooring gives this space a feel of an old village chaupal. Finding such a peaceful oasis in the heart of a crowded city Secuderabad feels like a bliss.


Our sacred space holds farmer's markets to support local produce, flee markets for local craftsmen and workshops for children and adults on many different themes. The Sunday Farmer's market that I witness was so good I am dreaming if we could have something like that in Delhi.

Later, back home I cooked the same pongal in pressure cooker. Since I was going to pressure cook the pongal in one step I decided to break the mung daal in smaller bits by running it into the mixie for a few seconds. The foxtail and mung mix was added to water (4 times the millet-lentil mix) and was pressure cooked with salt. Then a tempering was added and it made a really good lunch that day. I had chilled buttermilk with this meal.


It has been just too hot in Delhi these days and we have lost our appetite for heavier foods. Watermelon, buttermilk, chilled mango slices, chilled milk etc is what I am having mostly but I do eat a few spicy meals in between too. This pongal made me so happy with it's spice quotient and still felt very light on the system.

If you are using Pearl millet (bajra) or Barnyard millet (sama) for pongal you might like to cook them along with the mung daal as those take a bit longer time to cook. Just adjusting the cooking time and consistency you should be able to cook a delicious pongal with just any kind of millets you choose.

I was so glad to see so many varieties of millets available in Hyderabad, specially Our Sacred Space Sunday market was treasure trove for organic food seekers. The variety of millet rawa (millet semolina), millet vermicelli, broken millets etc is so good you would want to find out more ways to cook with them.

I buy my millets from Navdanya store, Down to Earth website and I Say Organic whenever possible. I also collect millets and lentils from my travels to interiors of the country. This foxtail millet from I Say Organic is from Uttarakhand.


Do let me know whenever you have a query about millets. I will be glad to share whatever I know.

Millets are ancient grains that need to be brought back to mainstream, not only for our own health but to break the pattern of monoculture of wheat and rice that is cause much harm to the agriculture and food chain both.

Did you know millets are hardy crops that can grow well in arid regions and don't need much chemical fertilizers or pesticides because they are naturally disease resistant. Also because millets have not been aggressively bred for huge yield etc. most millets are native varieties. Millets can be grown organically well and most millets you get in the market are grown by organic means.

Bring back millets on your dining table, every day.


Saturday, April 25, 2015

101 alternative flours | polenta cakes made using makki ka atta, with arrabbiata sauce | quick recipe of arrabbiata sauce


Polenta is my favourite. I think I have said it earlier too, probably many times. I like polenta as much as I like my makki ki roti. I know both are very different from each other but I always found a similarity, the sweet nuttiness of cornmeal that is so characteristic and the way both can be served in so many different ways.


The polenta I used to make earlier with corn grits was a regular for some time and then I started adding fresh corn to polenta, see the gruel type polenta with mushroom goodness and fresh corn polenta with cheese. Check out the baked polanta sticks too.

But then I decided to use regular makki ka atta (corn meal meant to make makki ki roti during Indian winters) to make polenta cakes. The result has been very encouraging, the polenta cakes set well and I can toast them really well on the cast iron skillet too. It doesn't take too much time in preparation and tastes really good. And the best thing is, that it is great even at room temperature. A win win situation really.

This time I served it doused with arrabbiata sauce and sage butter infused vegetables on the side, sprinkled generously with Parmesan.

ingredients...
(2 meal servings with loads of stir fry vegetables)

for polenta cakes 
corn meal (or polenta, I used makki ka atta) 150 gm
water 300 ml
grated cheddar 1 tbsp
salt to taste
oil or butter to grease the skillet and the metal rings to shape the polenta cakes

*arrabbiata sauce (I used home made) 1/4 cup (recipe in the end)

for stir fry vegetables
cauliflower florets 2 cups
cabbage chopped in big chunks 2 cups
sage leaves (fresh or dried) about a dozen
butter 1 tbsp
salt and pepper to taste

Parmesan cheese to sprinkle on top of the platter

procedure..

Mix the ingredients for polenta cakes in a deep saucepan (except butter) and whisk together. Now place the saucepan over stove and cook while whisking till the mixture becomes thick and soft dough like. Take the pan off the heat and grease the steel rings.

Now place the steel rings over silpat or a greased surface, spoon about 2 heaped tbsp of cooked mix into each ring and press down making a flat round cake (or tikki like shape). You can spread the whole cooked dough over a greased silpat and let it cool while it sets. Then cut into squares or triangles.

You can toast the polenta cakes while still hot as they set perfectly well and quickly. Or you can cool down completely to be sure, the cold polenta cakes can be refrigerated for later use too. Toast on a greased skillet to serve.

Since I make them fresh and toast them while still warm, it takes about 20 minutes to make two servings.

Smear the cakes with prepared hot arrabbiata sauce, grate Parmesan cheese over them and serve with meat or vegetables or whatever you like it with.

I made this sage infused stir fry for the side.


To make the stir fry parboil the cauliflowers and cabbage chunks separately in slated water. Drain and immediately dunk into a skillet with butter and sage leaves, toss on high heat for a couple of minutes, season and serve immediately.


recipe of arrabbiata sauce..

ingredients 
garlic cloves 10
fresh oregano leaves 2 tbsp or dried oregano 1 tsp
fresh thyme leaves 4-5 springs or dry thyme a generous pinch
fresh basil torn about 12 leaves
red chilly flakes 1 tbsp or as per taste
salt to taste
chopped tomatoes (preferably blanched and peeled) 3 cups
balsamic vinegar 2 tbsp
olive oil (extra virgin) 1 tbsp
Parmesan cheese grated 2 tbsp

procedure

Add olive oil, garlic and herbs in blender and make a coarse paste. Add the paste to a pan and place the pan over stove. Let the oil and herbs start sizzle, add the chilly flakes followed by the tomatoes, salt and balsamic vinegar. Stir and cook till it all gets saucy.

Add the grated Parmesan and let it get incorporated. Adjust seasoning and consistency as required and bottle. Keep refrigerated for about a a couple of months.


This sauce is a good condiment to keep in the fridge. You can toss a quick pasta or even boiled potatoes or cauliflower with this sauce to make a healthier meal. Never make this kind of sauces in small amounts, make enough for at least three to four meals for the family. I like the arrabbiata auce hot but you can always tone down the chilly heat a little bit.

With this polenta cakes the sauce doesn't taste so hot. Polenta tones down the heat as it is a bit bland in taste, with a nutty taste of it's own of course.
.

This is one of the most comforting meals one can have, that too very calorie efficient I must add. All the good fats, not an overload of proteins and all the carbs in the meal are complex and low glycemic index type.

Healthy meal.

 
Healthy Way powered by blogger.com
Design by Free7 Blogger Templates Simple Clean