Showing posts with label probiotic foods. Show all posts
Tuesday, February 2, 2016

recipe of pickled radish and making paratha meals healthier | radish leaves stir fry on the side


Pickled vegetables may be the way you can include more vegetables in your everyday diet with much ease possibly. This is for those who hate eating vegetables normally.

You do consume a bit of salt along with pickled vegetables but you can adjust the salt at the time of serving by adding a few elements to balance.

Normally pickled vegetables shouldn't make the staple vegetable intake but since pickling in certain ways causes fermentation and makes the pickle probiotic by lacto-fermentation, it is worth adding some pickled vegetables as a side dish or even in salads to bring some punch.

What is more interesting to know that this way you get cheap home cultured probiotics and once you use some fresh vegetables and whole grains in the meal you feed some prebiotics to your gut flora too. A healthy gut flora is the key to good health.

Moreover, you can pickle almost all vegetables you get in any season and pickling can be an all year activity on your kitchen counter. Each season has something delicious to pickle. I will definitely keep posting more recipes of probiotic pickles for you all.


Right now the winter months bring these gorgeous red radishes and I love pickling them in so many ways. The mustard pickled radish is one of the favorite way to pickle the mature radishes, the tender ones go into this brined pickle that I love heaping my plate with.

You know this way one can balance the meals. I usually make methi paratha using millet flours (mostly a mix of sorghum, amaranth and barley flour) or I add some whole chickpeas flour to the mix sometimes. The paratha is always made in ghee and is served with some full fat home cultured yogurt.

See how in this platter I have combined the paratha meal with a roasted tomato and coriander leaves chutney, some yogurt, some amla subzi (recipe will be shared soon) and loads of pickled radish.
 

Paratha is anyways healthy if served rightly, but this millet paratha meal has so much vegetables and fiber from whole grains packed into one meal that it makes the meal low glycemic and safe even for those who want to manage diabetes or weight related goals.

Don't worry about the apparent lack of proteins in this meal as sorghum, amaranth and chickpeas are quite a good source of proteins for normal people. Yogurt of course fills in.

Recipe of red radish brined pickle 

ingredients 

3 large radishes (preferably red) almost 600 gm
500-700 ml water (quantity of water used depends upon how you chop the radishes and how packed they are in the jar)
1 tsp sea salt
1 tsp sugar
1 tsp whole peppercorns

procedure

Clean, wash and chop the radishes in batons. The batons can be according to the size of the jar you want to stack them into. Or slice them if you like. Stack the batons into clean sterilized glass jars.

Heat the water with the rest of the ingredients till it boils for a couple of minutes. Cool down to room temperature and pour over the radish batons stacked in jars. You may need more water if the batons are packed loosely.

Cover the lid and let the radishes pickle on your kitchen platform for at least 24 hours before serving. The taste and texture stays crisp for about 2 days but it depends on the temperature so refrigerate as soon as the radish batons start getting too soggy. It will still be edible when it gets soggy though.

Serve this radish pickle on the side of an Indian meal or with burgers if you like or inside sandwiches or any which way you like. You might end up munching on them as is.

A great way to consume this radish pickle is to add it to some salad. The pickling liquid will serve as a nice dressing too is mixed with some olive oil etc.

The leaves of the radish make wonderful stir fry that we love as stuffing to our parathas or chapati rolls. The recipe of the radish leaves stir fry is simple.


Recipe of radish leaves stir fry 

Just heat some mustard oil (or use any other oil you wish) and tip in some ajwain seeds (Omum seeds), broken dry red chillies and chopped garlic to it. Let them sizzle and then add the chopped leaves of radish. Add salt, mix, cover and cook till the volume is reduced. Then stir and cook for a couple of minutes till the stir fry gets a little dry. 

Add everything to taste, the mustard oil brings much flavour to this stir fry we call mooli ki bhurji. The best taste of this bhurji comes when you use red radish leaves but any radish leaves are good. Add some bits of radish too if you want more of this bhurji to savour.


All such leafy greens are great prebiotic foods and if consumed with whole grains and some proteins they make balanced meals.

You see when such parathas are made using alternative flours they can be a meal in itself. And when these paratha meals are served along with some of these probiotic pickles, some full fat yogurt and may be some more vegetables or chutneys or dips on the side they make a satiating and filling meal that keeps you full till the next meal and you don't end up snacking on nonsense things in between.


Oh and the leftover parathas once quartered and reheated on the griddle make nice tea time snack if you wish. eating healthy is not much of an effort if you plan ahead and keep the ingredients clean and simple.

So make your paratha meals healthier with these probiotic salads of the season. Add more vegetable in every meal and see how your body thanks you in return. Say yes to a big paratha meal any day.
Saturday, January 16, 2016

winter pickles from north India | pickled seasonal vegetables | pickled salads using mustard as pickling spice


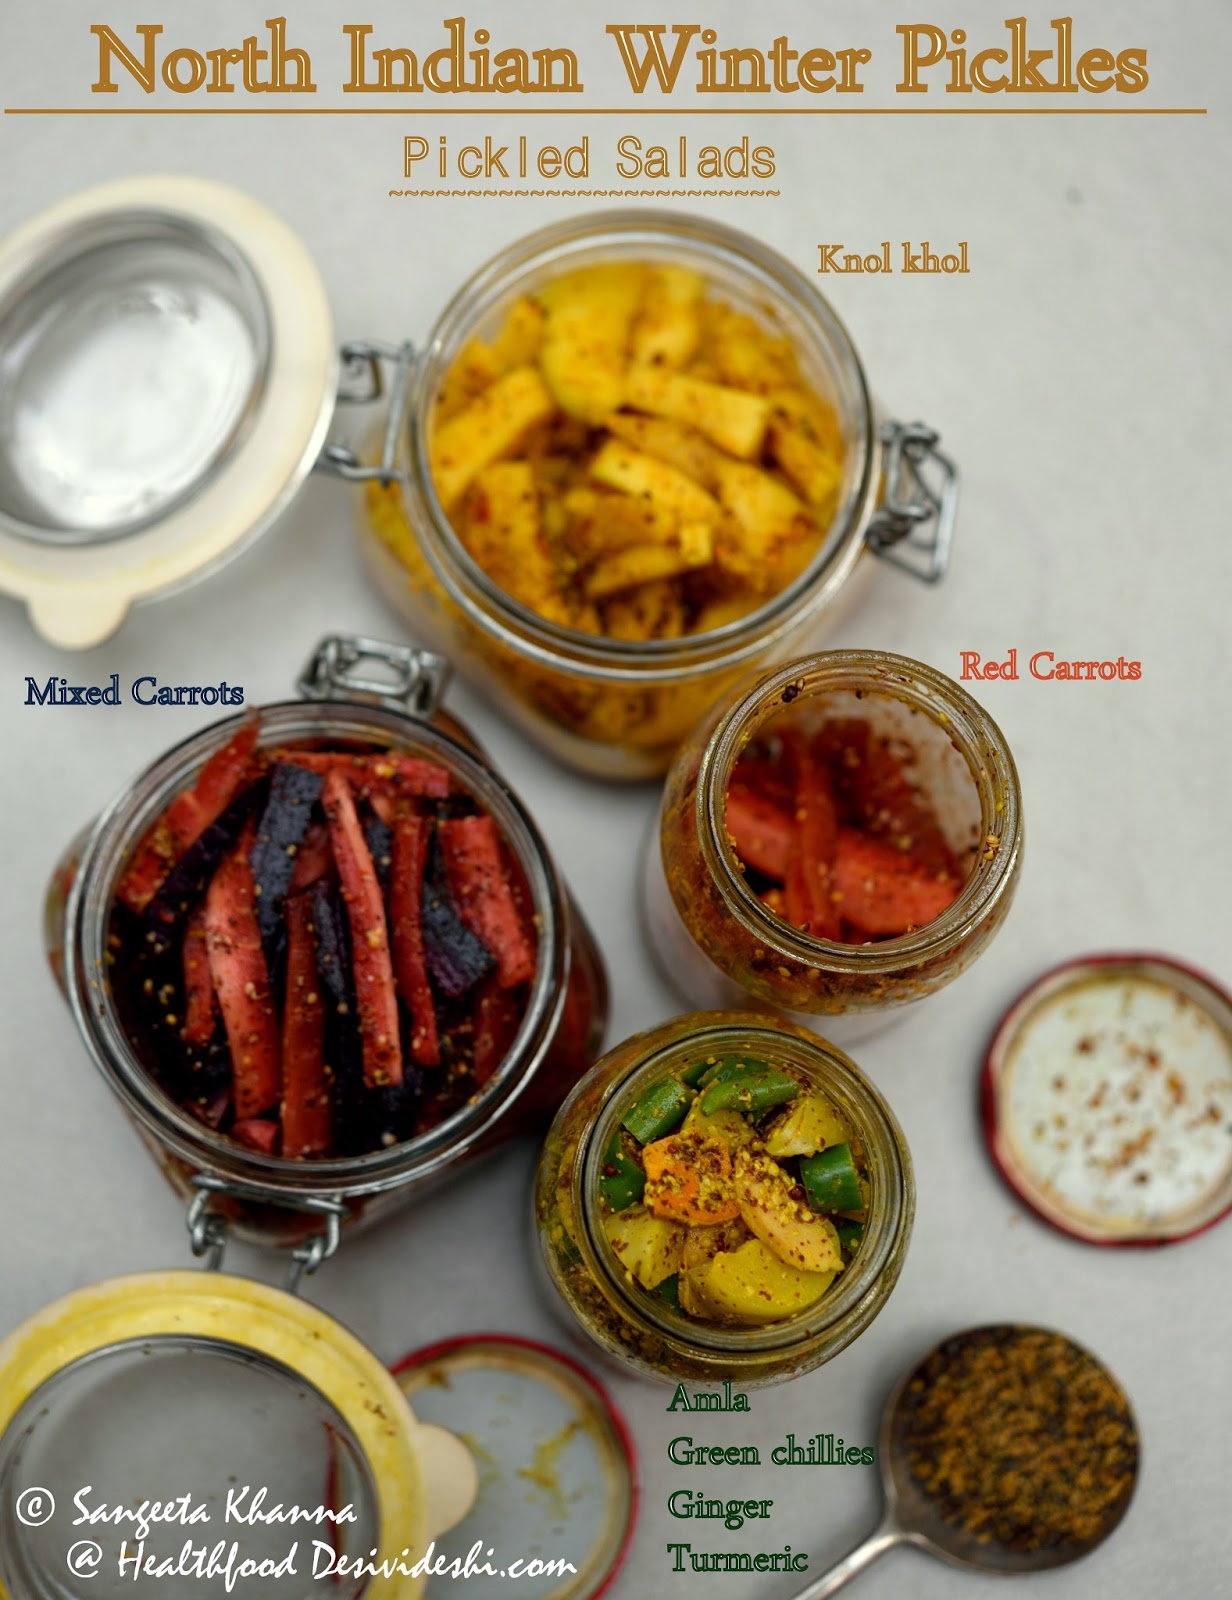
north Indian winter pickles

Pickling is a culinary art that has developed all over the world picking up flavours of the region. I often wonder how man started pickling so many things and so beautifully but being a fermentation enthusiast I know where it all started.

Fresh produce was a luxury and whatever the people grew in one season would not be available in the next. All the surplus fresh produce was always preserved in some way or the other and we have witnessed how sun drying, smoking and pickling has solved food problem across the world. Sauerkraut, Kimchi, Umeboshi, Sakura and all sorts of brined pickles are a testimony of how pickles have been an integral part of life all over the world.

pickles

In India we have so many variants of pickles made using spices and without spices, with oil or without oil and every season has a different produce to be pickled. Some of these pickles are made in such a way that they last several years but since it is a common practice to make pickles every season they are made just enough to last one year. Unless it is a pickle that is considered medicinal in it's aged form.

One of the aged pickles very popular in my region is the nimbu ka achar (called as nibuki in local parlance) which is basically brined limes, whole or quartered. It is given to someone with upset stomach with a thin mung ki khichdi and some fresh homemade (cultured) yogurt.

nimbu ka achar

I have shared some brined pickles like this amla and ginger pickled in brine. Another is this wild fig pickled in brine.

One of the variety of seasonal pickles is mustard fermented pickles, very popular in winters as the seasonal produce responds well to this method of pickling and traditional winter meals also pair well with these mustard fermented pickles. These pickles are also called as pani ka achar (watery pickle) in my part of the world for obvious reasons.

winter pickles

Yes, mustard helps fermentation along with red chilly powder (much like Korean Gochugaru) and we make kanji using the same method in a watery medium. For the seasonal vegetables to be pickled we don't add any water because the vegetables have enough water in themselves to let the flavours soak in.

amla turmeric and ginger pickle

Beautiful play of osmotic pressure in these pickles that is utilised for culinary use since ages.

The mix of mustard, red chillies, turmeric powder and salt is immensely medicinal as well. Mustard is known to improve metabolic rate and as an anti inflammatory agent, it improves blood circulation and is antiseptic too. Turmeric is another antiseptic herb that is antioxidant rich, anti inflammatory, analgesic and antiseptic. Red chillies are known as powerful analgesic and anti inflammatory because the capsaicin improves blood circulation, helping the body to heal naturally. 

With so much goodness these pickles are indeed quite healthy. To add to the health quotient of these pickles the fermentation process makes them probiotic too. What an easy way to get wholesome nutrition and healing benefits from homely pickles.

The good thing is that you can use almost every vegetable to make these pickles. Traditionally the gourd family vegetables are not pickled but once you get the hang of it you might want to try those too. These pickles are made during winters mostly, probably because they aid in digestion and help the gut health too. Traditionally winters means heavier foods and increased consumption of ghee and fried food that tastes really great with these pickles I must add. The traditions develop for a reason of course.

seasonal vegetables

The vegetables that are used for this kind of pickling are mostly root vegetables, ginger, fresh turmeric, some beans specially the flat variety, cauliflowers, some leafy greens like chickpea shoots and even fresh green peas or soaked chickpeas.

This mustard fermented pickle is made in the north India. The vegetables being pickled may differ in different regions. Gajar-Gobhi ka achar (pickled carrots and cauliflowers) and mooli ka achar is staple in Punjab while hari mirch ka achar (pickled green chillies) is from Rajasthan. In Uttar Pradesh we pickle a lot of vegetables this way.

Many families will add some soaked chickpeas to the jar of pickles when it is just about to finish to make it last longer. I like adding some fresh peas too.

How to make the winter vegetable pickles with mustard...

While the pickling spices remain the same in these pickles that is mustard, turmeric, chilli powder and salt, the procedure differs with different vegetables as some of the vegetables have higher water content some are dry. Also because some of the vegetables we like crunchy and some others are preferred a bit softer. I have listed the recipes of some of the pickles I have been making.

Amla Haldi Adrak ka achar (amla, fresh turmeric root and ginger root pickle)...

amla turmeric and ginger pickle

ingredients 
(to fill 2 jars measuring 500 ml)

12 amla cut into wedges
12 large sized green chillies, preferably mild hot (bhajiya mirchi works in India, try Jalapeno or Anaheim or Banana peppers whatever available in your part of the world)
about 150 gms of ginger root cleaned and sliced
about 150 gms of fresh turmeric root cleaned and sliced
3 tbsp mustard powder (yellow or black)
1 tbsp turmeric powder
1 tsp red chilly powder
salt to taste or about 1 tbsp

procedure 

Slice and chop everything as desired and mix with all the ingredients in a glass bowl. Give a good toss and fill in clean jars.

This pickle is ready to eat in about 3 hours and keeps changing in taste for 2-3 days. In Indian summers we keep it only for 2 days at room temperature and then refrigerate. The pickle keeps maturing slowly and get sharper in taste by time.

If refrigerated it lasts about 4 weeks.

Sem aur hari matar ka achar (flat beans and fresh green peas pickle) ...

Not many people make pickle using flat beans but it tastes really good. I like it with green peas and sometimes with added cauliflowers and broccoli etc.

The reason for pairing these vegetables together is because these vegetables need a parboiling treatment unlike the root vegetables or amla or green chilies etc.

pickled flat beans

ingredients 
(to make a jar full, measuring 1 liter)

500 gm flat beans or mixed vegetables
200 gm green peas or soaked chickpeas
4 tbsp mustard powder (yellow or black)
1.5 tbsp turmeric powder
1 tbsp red chilly powder
1.5 tbsp salt or to taste

procedure 

Prepare the vegetables first. Beans, cauliflowers or broccoli need a little blanching or parboiling depending on what texture you like.

String the flat beans and split them open. Cut them in pieces if you wish. Using tender beans is desirable.

If using cauliflowers or broccoli, separate the florets.

Boil water in a large pan and dunk everything together. Add the peas too along with everything else and wait till the water comes to a rolling boil once again. Drain the water in a colander and empty the vegetables into a mixing bowl.

Add the spice mix and toss. Fill in clean jars. The pickle will be ready after 12-15 hours and will stay good for 2 days at room temperature and should be refrigerated after that. Make small quantity if you want to keep the jars on the dining table.

carrots, knol khol or radish pickle in mustard ...

These vegetables can be pickled together like a mixed pickle or can be pickled separately as I do. I want the vegetables to maintain their own flavours and I love them this way as a salad in generous helping.

See how I eat the knol khol pickle with my meals. You can see laal chowli and rocket stew, black sorghum roti and loads of pickled salad on my plate.

pickled knol khol

The radish pickle has been shared earlier. I like to toss this pickle into my sprouts or boiled chickpeas salads as shown here.

This radish pickle is in fact a great way to use up any mature radishes. The mature radishes soak up the flavours faster and give a good bite to the pickle.

You can make the radish pickle using any kind of radish available.

pickled radish

I often use mixed carrots to make the carrot version of this pickle and have experienced that the mature and large carrots taste better in this pickle.

Here I have used black carrots that are normally used for making kanji along with the red carrots that are normally used for making gajar ka halwa.

mixed carrot pickle

ingredients for making carrot, knol khol or radish pickle in mustard...

500 gm of any of these vegetables cut in batons or cubes
2-3 tbsp mustard powder
1 tbsp turmeric powder
1 tsp chilli powder (a little more for carrots)
1 tbsp salt

procedure

Mix everything up and fill in clean jars. These vegetables soak up the flavours faster and get ready to eat in 2-3 hours. You can wait for 2 days to get the sour flavour and then refrigerate for 3-4 weeks.

We even pickle boiled potatoes this way but the pickled (boiled) potatoes do not stay for long. Once made the pickle is ready to eat instantly and can be kept on the dining table (room temperature) for 2 days in winters and for a day in summers.

Luckily I found this boiled potato and chickpea shoots pickled with mustard. In my family the chickpea shoots (chane ka saag) was not pickled but once I was talking to Arvind's aunt and she told me they pickle chane ka saag this way. So next time I found some chane ka saag I wanted to try this.

The chane ke saag ka achar was so good I started combining it with the boiled potato version. It gets over quickly whenever I make it.

I would suggest to make this version just enough for a day's worth.

Chane ke saag aur alu ka achar (chickpea greens and boiled potatoes pickled with mustard)...

alu aur chane ke saag ka achar

ingredients 

250 gm boiled, peeled and cubed potatoes
100 gm washed, drained and finely chopped chickpea greens (chane ka saag) or use baby spinach
1 tbsp mustard powder
1 tsp turmeric powder
chilly powder to taste or minced green chillies (I used green)
salt to taste

procedure

Toss everything together and mix well. Keep covered for an hour before serving.

This is actually a wonderful potato salad that I love making whenever I get hold of chane ka saag.

Actually I call all these mustard based pickles as pickled salads as these can be served just like the salads or kachumbers we serve with Indian meals. I make more pickled salads if you want to check out. 

If mixed with some sprouts or boiled chickpeas or even some paneer, these salads can become a salad meal. See how I mix them up to make my meals here.

These salads are generally called as pani ka achar in Uttar Pradesh as I mentioned. The reason being there is no oil used in this pickle while other Indian pickles use oil to preserve the pickle for long.

You see you can pickle almost everything and have a great value out of your pickling efforts. These pickles are easy and cheap, provide great nourishment and also help heal the body, especially the gut. More reasons to make them as soon as possible.

Do let me know whenever you make them.

Wednesday, September 16, 2015

Amla or Indian gooseberry and using it to make spiced buttermilk | common every day super foods


amla buttermilk

Amla (Emblica officinalis) is a super food and only one small berry contains as much antioxidants as a basket full of assorted fruits. Amla buttermilk is an instant and delicious way to get a few super foods together in a mug. Affordable, local super foods.

Every now and then a new super food floats into the market and everyone jumps to buy it and use it in their smoothies and to top their salads. Yes most of the super foods have great nutritional value but many of them come at a cost that our environment pays, thanks to these super foods being imported from one part of the globe to another in this market oriented food system.

So if you are going to order Goji berries online at a hefty price tag, think twice and take a stroll into your local vegetable market instead. Please make an effort to find the treasures that your grandmother used to relish. You will find at least a few every time you go to your local vegetable market, wherever you are. Supermarkets stock only shelf stable produce, you may be missing a lot of valuable nourishment if you never consider shopping elsewhere.

Indian Gooseberry or Amla or Aonla (Emblica officinalis) as it is called in local dialects, it is the most important Kaya kalpa (rejuvenation) medicines of Ayurveda and makes a lot of medicines in combination with other herbs.

Amla contains all tastes (according to Ayurveda the six tastes are sweet, salty, sour, bitter, astringent, pungent ) except salt and thus relates to all the three humours (Vata, Pitta and Kapha) and balances them in the body. Amla is a strong antioxidant helping the body and immune system, and helps fight Ama or toxins in the body on all levels (source). Super food indeed, that too with high potency in small amounts.

We make a chutney with boiled amla an another with raw amla and other ingredients, these chutneys are a great way to include the fresh herbs and amla in one's everyday diet.

The buttermilk I am sharing today is a very delicious refreshing drink that packs five super foods not one. Yogurt, curry leaves, green chillies, ginger and amla all are super foods in their own right. Your grandmother knew it all, may be you have forgot what she talked about. May be you overlooked.

amla herb buttermilk

Just use one amla per serving and add as much ginger, curry leaves, chillies and salt n pepper you wish and adjust seasoning as per taste. Have it chilled or at room temperature and see how you love this drink.

I like using 4 mature curry leaf springs, one green chilli, 2 slices of ginger (as shown in the picture above) and one amla per serving and love what the result is. 

amla herb buttermilk

Let me know when you make this drink. If you don't get fresh amla berries in your part of the world you can use amla powder (1/4 tsp per serving) soaked overnight or at least a couple of hours. Amla powder is as potent as fresh ones but the taste may differ a little bit. Frozen amla is a better option if you have access to that.

amla herb buttermilk

There is bottled amla juice available in the market too these days but using one amla everyday either in chutney form, or in this buttermilk will be much better as consuming amla in real form is the best way to get the benefits. Bottled juices may or may not be packaged rightly and must be consumed as the last resort.

What ways do you consume amla in your home?
Please don't tell me about amle ka murabba.
I want more savoury ways to consume amla every day. Please share your recipes and tips.


Tuesday, July 28, 2015

5 healthy home made dips to make lunch boxes fun | healthy dip recipes for everyday


homemade dips

Dips, chutneys and raitas are my way to include more vegetables in every meal. These work like eatable smoothie for me and make my meals interesting to say the least. Life is so much more convenient when there are a few dips in the fridge.

Lunch boxes can also be made convenient with some flavourful dips that keep well for a week or so in the fridge. Addition of yogurt or seeds and nuts adds nutritive value to roasted, sauteed or steamed vegetables to make a dip.

Making a few dips in a single day may get a lot of work to do but if we plan well we can keep making 3-4 per week in large batches and refrigerate them all in glass jars. This makes it easy to have a few options available always to serve with vegetable sticks or steamed vegetables, to spread on breads and to serve with even paratha breakfasts to kids.

homemade dips

For lunch boxes I feel a simpler meal becomes much more enjoyable when there are two different dips packed with it. My millet type breads are always made tastier with these dips. I rely on the raitas, chutneys and parval ka chokha or baingan ka bharta or baingan ka raita type mashed vegetables when there are no dips in the fridge.

Especially in summers I sustain on watery vegetables and mashed vegetables that can be eaten at room temperature. My system just can't work unless I have loads of vegetables and bharta, chokha and raita becomes an everyday staple. Soups are for winters of course.

Another broccoli dip with green garlic shoots and quark cheese is a winter favourite in my home, and an aubergine and nuts dip is made frequently in all seasons.

I like hummus too but he vegetable based dips are more my type. Chickpea hummus, red kidney beans hummus and mung bean hummus can be great for lunch boxes too if you carry some steamed vegetables to have them with.

Here are five dips capable to pack your meal with more zest..... 

1. Beetroot Tzatziki with garlic..

I have adapted the classic Greek tzatziki into a potent garlicky dip that goes a long way in ensuring your meal is never boring. The colour and antioxidant boost comes form beetroots and garlic makes it irresistible. It will remind you of garlic thoum (or toum).

beetroot tzatziki

Recipe of beetroot tzatziki....

  1. Grate and steam one large beetroot (about 150 gm)
  2. Mince 6-8 cloves of garlic  (or to taste)
  3. Hang 400 gm yogurt into a muslin to make hung yogurt (or just prick the aluminium foil cover of a yogurt pack and invert over a mug, keep this apparatus in fridge overnight to get thick hung yogurt the next day) 
  4. Whisk everything together with salt to taste and some white pepper. 
  5. Garnish with mint if you wish. 
2. Baba ghanouj the roasted eggplant dip..

There is nothing special about baba ghanouj in fact. We always have some seeds, some yogurt at home and we always get the aubergines char grilled to make either a bharta or raita. In fact there is always some char grilled baingan in a glass container in my fridge. I love it so much I keep experimenting with it a lot. 

In this recipe I have used a little yogurt, and a mix of seeds to make this baba ghanouj, normally it is made using tahini (sesame paste) and no yogurt is added. Addition of yogurt makes the dip lat longer in the fridge and makes it probiotic in nature too. 


baba ghanouj

Recipe of baba ghanouj ...

  1. Char grill 2 large eggplants (aubergines or baingan), peel and reserve the flesh. 
  2. Mix 2 tbsp each of sunflower seeds, sesame seeds and melon seeds along with salt, roasted cumin powder, 4 cloves of garlic and 1/4 cup thick yogurt and blend well in a mixie jar.
  3. Add the roasted eggplant to the blender and blend once more to make a smooth dip.
  4. Add minced parsley or coriander greens if you wish.
  5. Fill in a glass jar and pour 2-3 tbsp extra virgin olive oil to make a top layer and refrigerate up to 2 weeks.

3. Red bell pepper and shallots dip...

I use red bell peppers occasionally but in smaller amounts in recipes, the reason is that the husband is intolerant to bell pepper smell. But I love them so I try and make recipes where the red bell pepper smell is subdued by something else. It is a practical way to make something suitable for both of us.

This red bell pepper dip is 'supplemented' with loads of shallots, some garlic and some sun dried tomatoes. I say supplemented with shallots because shallots and onions both are so nutritive that their nutritional value is comparable to milk, and unlike milk the onions are loaded with Vit C too. So including onions and shallots is a great way to ensure efficient nutrition as I say.

red bell pepper dip


Recipe of the red bell pepper and shallots dip..

  1. Chop one large bell pepper and about 15 shallots (or one large onion) roughly. 
  2. Heat 1 tbsp mustard oil in a pan, tip in 8 peeled whole garlic pods, 3 whole bedgi red chillies (or add paprika later) and fry for a second. 
  3. Add the chopped shallots and bell peppers, toss to let everything sear and caramelize. 
  4. Add salt and mix. Remove from heat and add a handful of sun dried tomatoes, a handful of (about 2 tbsp) sun flower seeds and 2 tbsp vinegar. 
  5. Transfer everything to a blender and make a coarse paste.
  6. Store in a glass container for up to 2 weeks.

4. Spicy Apricot chutney recipe ..

I learnt this recipe from Lata Bharti, the owner and hostess at Raju Cottage at Goshaini (HP). She is a generous host and loves chatting up if you are not clicking her pictures. We share recipes, stories and talk about general life whenever I am visiting Raju's Cottage which has become a refuge for us.

This apricot chutney we loved so much that Lata packed a jar for us. Then I made it at home and found it a very useful chutney just like our own tamatar ki mithi chutney, but with a little twist.

apricot chutney

Recipe of spicy apricot chutney..

  1. Remove sees from about 250 gm fresh apricots, mince 4 pods of garlic and 1 inch piece of ginger.
  2. Mix the above with 1/2 cup of water and 1 tsp, red chilli flakes, 1/4 tsp pepper powder, 2 tejpatta leaves, 1/2 tsp salt and 1/2 cup sugar. 
  3. Cook the above mix till the apricots get amalgamated with the other ingredients and it smells nice and spicy. Stir and cook till it starts looking almost like a jam.
  4. Add 3 tbsp vinegar, stir to mix and fill in a sterilised glass jar. This chutney keeps well without refrigeration for long.

5. No cook mango dip...

This is one of those quick recipes that save you in difficult times. Just mix a few things in 2 minutes and a nice condiment is ready. This is actually a relish and can be blended to make a dip depending on what you want to serve with it.

ripe mango dip

Recipe of raw mango dip...

  1. Chop a ripe mango roughly. Sweet and sour type of mango will be suited more but you can add a bit of lime juice if the mango is all sweet. 
  2. Add a dash of balsamic vinegar, red chilly flakes and salt and your relish is ready. Mash it or blend it to make the way you like. 
  3. It tastes great with roti, paratha and sandwiched between bread slices. Or try it with poha and see how you like some nice mango poha.
I am sure these dips will make your meals a bit more interesting, the lunch boxes a bit more colourful and flavourful, packed with nutrition nonetheless. Please let me know if you make these. The quick homemade tomato ketchup would also be helpful in ensuring you never eat those hideous sauces anymore. 

And please don't forget to comment on the ongoing lunch box series. there are a few giveaways you might like to win for yourself. Please read the series and give me your feedback. See you really soon with yet another lunch box post in a day or two. I am trying to keep my promise to announce the giveaways by the end of July. 


Saturday, July 18, 2015

home made yogurt | making 'cultured' yogurt at home and assembling 'real' fresh fruit yogurt | fruit yogurt for lunch box


buttermilk

Yogurt is my everyday snack in whatever form, buttermilk is the favourite drink that I keep making with several herbs or just with a hint of salt when in a hurry. I like it chilled, at room temperature or cooked in curries too. Yogurt in an Indian home never goes waste even if it becomes too sour. We have a recipe for all kind of yogurt and we like making our own yogurt at home.

For a couple of years in between, I had started buying yogurt from the neighborhood booth of Mother Dairy. Despite the fact that I know packaged yogurt is not the same as home cultured ones, I fell prey to the convenience factor. And then I realised I was not eating yogurt everyday anymore. Yogurt was just a bowl of a good thing I had to tell myself to eat, there was no pleasure in doing so. 

And then while shifting some kitchen utensils to another cupboard I found this pretty earthen pot that I used to set my yogurt in. I held it in my hands for a while, sniffed the insides and it still smelt of yogurt. The porous material holds the yogurt within. 

I washed it, filled it with warm milk and kept it covered on the kitchen platform to find perfectly set yogurt in about 4 hours. Indian summers are great for yogurt making. 

home made yogurt

Exactly the way it used to set earlier, the familiar aroma, the familiar layer of watery whey and some floating mass of live culture. Lactic acid bacteria can remain dormant for long time and revive as soon as they find milk. And they did well in this case too.

And then it became a daily routine and I started looking forward to my yogurt once again, sometimes having another bowl just because I loved the taste so much.

I even started reducing the milk to thicken it and setting yogurt in the earthen pot just like my grandmother used to do. The yogurt made with reduced milk tastes more rich and a bit smoky.

home made yogurt

But that phase got over because reducing milk is no fun. I resorted back to just heating milk to about 45 C and setting yogurt every single day. 

Here is a quick DIY check list if you are making yogurt at home...
  1. Use unpasteurized milk if possible, but pasteurized milk also makes good yogurt, the 'yogurt culture' has to be good quality and that is the deciding factor in how your yogurt turns out to be. 
  2. Get your yogurt starter from a home where yogurt is made regularly. Beg, borrow, steal, trust me a good yogurt is worth all the effort. If you live in a part of the world where no one makes their yogurt at home, you could look for cultured yogurt or cultured buttermilk on the supermarket shelves or at health food stores. Use 1/4 cup of cultured buttermilk as a yogurt starter for the first batch of yogurt and then use a tbsp from the fresh yogurt you made.
  3. To make yogurt just heat the milk to 40-45 C or lukewarm to touch, mix 1 tbsp of good yogurt (or 1/4 cup cultured buttermilk) to it, whisk well and cover. Keep it in a warm place till the yogurt sets. It takes about 4 hours in Indian summers, in winters we keep it either in water bath or inside warm oven. Don't forget to save a tbsp of starter from each batch to set the next batch of yogurt.
  4. If for any reason you cannot find any yogurt starter or cultured buttermilk, use dry whole red chillies with their stems to set yogurt. They have lactic acid bacteria on the surface and they help set perfect yogurt. Just warm milk, pour in the pot to set yogurt and drop in a couple of dry red chillies on it. The chillies don't submerge. Remove them as soon as the yogurt is set. The chilies don't impart their heat to the yogurt. 
  5. If you want to carry your family yogurt culture abroad there are a few easy ways to do so. Carry an earthen pot like above which was used to set yogurt a couple of times and has been dried after a rinse. This pot will automatically help set yogurt once you fill it up with warm milk. Or you can soak a small piece of clean muslin in fresh home made yogurt and dry it under sun. Fold the piece of yogurt laced muslin and pack it in ziplock bag and carry. Dip this muslin in warm milk and let the yogurt set, remover the muslin once the first batch of yogurt is ready. In older times yogurt culture in this form was given to daughters when they got married as part of the dowry (source~ First Food) 

I hope I keep being regular with my yogurt making now, as there is no match to the taste of real buttermilk that I make after churning the butter for making ghee. 

buttermilk

Yes I started making ghee too again. That we will discuss some other time. The homemade yogurt brought back the habit of tossing fruits in yogurt too to make a filling snack or a cooling light lunch. You want to eat more yogurt in many different ways when you have good delicious yogurt at hand. 

The fruit yogurts are perfect snack for office too, you can always carry an extra jar of fruit yogurt or an appropriate glass container that doesn't leak.

We like any fresh fruit in yogurt. It is always much better than the 'flavoured' fruit yogurts. Here is a musk melon, sticky dates, chopped almonds and chia seeds yogurt. It doesn't need any sweetener.

fresh fruit yogurt

The real taste of a fruit cannot be achieved by chemical flavorings, though chemical flavorings and sweeteners together may make the fruit yogurt comforting in nature IF you haven't ever tasted the real thing. Try making the real fruit yogurt and compare the two. You will find all your answers.

fresh fruit yogurt

Here is another version that I make using apricots, plums, some chopped figs (dried), chopped almonds and chia seeds.

fresh fruit yogurt

After about 4-5 hours the flavours mingle so well it looks like this. Absolutely yummy.

fresh fruit yogurt

You can play with seasonal fruits or use dried fruits if you could shop for grocery lately and there is no fresh fruit left. Yogurt will make the dried fruits better. Add chopped nuts and seeds as you like.

fresh fruit yogurt

These fruit yogurts can be a meal in itself if you wish, have it in a huge bowl and stop worrying about calories in it. Fresh fruit yogurt can't have more calories than you can handle.

Or have a fruit yogurt as a generous dessert after a meal. For lunch boxes too yogurt can make a plain packed meal interesting and nourishing at the same time.

fresh fruit yogurt

Those who don' like yogurt or avoid milk products can always make a nuts and seeds salad with some sauerkraut or pickled salad thrown in for the daily dose of probiotics.

Few guidelines for packing yogurt for lunch boxes...

  1. Get a leak proof tumbler or a nice bottle for flavoured or herbed buttermilk. Buttermilk is a great way to hydrate during summers and can be a good substitute for coffee and milky chai if you have fallen pray to work time coffee habit. Try some intense mint or curry patta spiced up buttermilk and see how it brings back the energy level. Electrolytes, much needed water and probiotic all at the same time brought to you by buttermilk. Dilute the buttermilk if you plan to have it frequently and use fresh herbs or dry mint, curry patta or moringa powders.
  2. A suitably sized glass jar or Tupperware container is also good for yogurt. You can have a few of these and set your yogurt directly in these jars and refrigerate. Fruits, nuts and seeds etc can be added and the jars can be carries as is. 
  3. You can try freezing the buttermilk or fruit yogurt containers and packing them in padded bag to carry if your office doesn't have a refrigerator to store. This way the yogurt or buttermilk comes to right temperature at the time of consumption. There are some ice packs in the market that can be packed along with yogurt in a bag so keep it chilled. In air conditioned offices the yogurt and buttermilk doesn't spoil normally, the above suggestions are good if you like your yogurt chilled.  
  4. Keep some herbs ready to flavour the yogurt and buttermilk everyday, fresh fruits or dehydrated fruits are a personal choice but make arrangements of the ingredients before had so you keep up the habit of carrying your own yogurt. 
  5. A very dear friend who is single and male and cooks his own lunch boxes, told me recently that he started carrying buttermilk with his lunch box after seeing my buttermilk pictures. But his office friends started asking him why does he carry so many things to eat like kids, not that my friend cares. Let me tell you one thing, the same friends will come to have a sip after a few days and then some of them will start bringing their own too. Make it fashionable in your office I say. 

There is nothing more refreshing than a fresh mint buttermilk. Loads of mint, hint of green chilly or black pepper and salt makes me refreshed always without a fail.

buttermilk

And it is not just about the momentary refreshing feeling. It is also about how your gut feels after a few shot of 'work stress induced coffee' and how this coffee induced freshness lasts only an hour and after so many shots of coffee you still feel dull in the evening.

Start having these variations of buttermilk or Iced teas and see how the 'real' herbs and electrolytes boost your spirits and keep your gut also healthy. You will feel the difference every evening trust me.

buttermilk

Note that you can win a few useful pretty things useful for your lunch boxes in the ongoing lunch box series. A couple of these pretty bottles for buttermilk and Iced teas are also being given away to one of the comments that I like.

Please comment below and tell me if you carry yogurt to office and what way you like it. There is a Tupperware steamer and a hand painted lunch box by Trove as give away too, check out the lunch box series for more useful information and participate by commenting on any of the posts you like..


Tuesday, December 16, 2014

101 gluten free breakfasts : poha (flattened rice) is for everyone | 4 recipes of a probiotic breakfast


Gluten free breakfasts are easier than the sound of it. There are many ingredients that would surprise you about the variety you can afford to have once you ditch that toast or paratha for breakfast.

I have written about how poha (beaten or flattened rice) is a probiotic and prebiotic food, a good quality ready to eat cereal that can be used in so many different ways that no packaged cereal can beat this. Poha can make sweet breakfasts with yogurt and fruit, smoothies with poha and it makes the popular savoury breakfast called pohe with a prefix of onion, potato or peas whatever you add to it. Kande pohe, batata poha and dadpe pohe all are different ways to relish this native cereal produced and used all over India in some form or the other. My experiments have resulted in some yummy concoctions like poha with mango and coconut. But there are a few versions I am yet to share. Bringing some of them in this post, hopefully you would also like them as much as I do.

1. recipe of pohe with paneer matar (preparation time 15 minutes)

ingredients
(2 large servings)
dry poha 1 cup
fresh green peas 3/4 cup
paneer 50-60 gm (crumbled or cut in small cubes)
cumin seeds 1/2 tsp
chopped green chillies 1 tsp or to taste
minced ginger 1 tsp
salt and pepper to taste
chopped coriander greens to garnish
lime juice to finish, as per taste
ghee 2 tsp


procedure..

Rinse the poha under tap water keeping it in a sieve. Keep aside.

Heat the ghee in a wide pan and tip in the cumin seeds. Let the cumin crackle and add the green chillies and ginger, followed by green peas and salt. Mix and cook covered for 5 minutes or till cooked.

Now add the crumbled paneer and stir fry for a few seconds or till the paneer heats up and soaks in the flavours.

Add the drained poha, lime juice and pepper powder, mix well and cook covered on very low flame for 2-3 minutes or till the poha warms up thoroughly.

Sprinkle chopped coriander greens and serve hot.

We like having ginger tea with this kind of breakfast.

2. recipe of kande pohe (preparation time 15-20 minutes)


ingredients
(2 large servings)

dry poha 3/4 or 1 cup
diced red onions 1 cup
finely chopped potatoes (preferably with skin) 1/2 cup
chopped green chillies 1 tsp
chopped curry leaves 1 tbsp
cumin seeds, fennel (saunf) and mustard seeds 1/2 tsp each
turmeric powder 1/2 tsp
salt and pepper to taste
fresh grated coconut 2 tbsp
roasted peanuts 2 tbsp
chopped coriander leaves 1 tbsp
lime juice as required
ghee or peanut oil 1 tbsp

procedure

Rinse the poha under running water, keeping them in a deep sieve. Keep aside to drain.

Heat the ghee in a wide thick base pan and tip in the cumin, fennel and mustard seeds. Wait till they all crackle and then add the chopped onions, curry leaves and potatoes. Add salt, turmeric powder, green chillies and stir fry on medium flame till done. You can cover the pan to quicken the cooking process. It takes about 5 minutes for this quantity.

Now add the soaked poha, chopped coriander greens and pepper powder mix well and cover and cook for 3-4 minutes on very low flame. Take the pan off the flame and add the lime juice to taste, adjust seasoning and serve in bowls. Sprinkle grated coconut and roasted peanuts on top and serve immediately.


3. recipe of dadpe pohe (preparation time 10 minutes, resting time 30 minutes)

This dadpe pohe recipe is a Maharashtra special (most poha recipes originated there btw) and doesn't involve cooking and is preferably made with tender coconut water as well as tender coconut meat. But one can make it using regular coconut milk and fresh grated coconut too. Being uncooked poha this recipe provides the best probiotic benefit. This recipe uses freshly grated coconut and packaged coconut milk. If using tender coconut water one can skip rinsing the poha and soak them in the coconut water itself for better flavours.


ingredients..
(2 large servings)

dry poha 1 cup
coconut milk 100 ml (half a carton pack)
chopped green chillies 1 tsp
chopped red onions 3/4 cup
minced ginger 1 tsp (optional)
chopped green coriander leaves 1/4 cup
lime juice 1 tsp
salt and pepper to taste
freshly grated coconut 2 tbsp or a bit more
roasted peanuts 2 tbsp (optional)

procedure..

Rinse the poha under running water and drain completely. The poha looks like this after rinsing and letting them soak for 5 minutes.


Now add the other ingredients except peanuts, mix well in a bowl and press with a small plate to cover the poha mix and keep a heavy bowl over this. Pressing the poha is done to allow the poha to soak all the flavours. I find 30 minutes of pressing enough to soak up the flavours but it depends on the type of poha being used. Normally when one cooks poha the heating makes the flavours seep in easily. For this raw preparation this pressing method is very important.

Serve cold (at room temperature) topped with a little more grated coconut or peanuts. The husband loves roasted peanuts but I skip adding them if it is a flavourful dadpe pohe.


This dadpe pohe might not be the best poha recipe for winter months but in summers this recipe is such a refreshing breakfast that we like to make it quite often. No cook recipe get repeated for other reasons too. Convenience doesn't mean eating instant noodles.

4. recipe of microwave poha (preparation time 5 minutes)

This is another instant recipe that involves just mixing the ingredients and microwaving all of them together for 2-3 minutes per serving. This poha recipe gives instant noodles a run for their money.

ingredients..
(2 large servings)

dry poha 1 cup
chopped red onions 1 cup
chopped green coriander leaves 1/2 cup
chopped green chillies 1 tsp
salt and pepper to taste
lime juice to taste (optional, I hardly add lime juice to this recipe)
fresh grated (or desiccated) coconut 1-2 tbsp
roasted peanuts 1-2 tbsp (optional)
ghee (do not replace with any oil) 2 tsp

procedure..

Rinse the poha just like the above recipes.

Mix all the ingredients in a microwave safe bowl and microwave (covered with a loose lid) for 2 minutes. Stir well and microwave again for 2 minutes or till a cooked aroma of coriander greens and fresh poha with a whiff of ghee is noticeable.


Serve hot and see how you like it so much better than any instant noodles.

I add the dry garlic chutney to this poha sometimes to add more flavours but the south Indian gunpowder also works great. Sprinkle it after serving it on your plate and see how you can make it even more hot and tangy.

And here is a microwave cooked poha topped with fried cashews.


This poha is made using the red poha we sometimes get in north east states of India or even in Maharashtra. Thanks to our travels and the tendency to shop for such ingredients, we end up tasting a lot of things that we don't get where we live.

Now with so many ideas with breakfast poha, gluten free breakfast will not be boring at all. I do eat wheat but minimal use of gluten is what I aim for as I feel lighter whenever I eat gluten free food. Thank God there are so many options of gluten free foods to choose from in Indian cuisine.

I am posting these recipes of gluten free breakfast for all those people who are dependent on breads and parathas for breakfast and complaint that this kind f breakfast is filling and satisfying but it makes them slugging after an hour. Try having a plateful of poha and see how it makes you feel different.

PS : these recipes make 2 really large servings. We generally have a large breakfast when we plan a salad meal for lunch but all these poha recipe can be really light if one serves them in smaller portions that suits well for a tea time snack.

 
Healthy Way powered by blogger.com
Design by Free7 Blogger Templates Simple Clean